Archivi tag: nailtech

Recreating my old designs

Welcome back to my blog!

In the article Who I Am I published some of my photos of old works created especially with Nail Polish.

Today I decided to show how I reinterpreted and created some of my old designs!

Let’s start!

Leopard

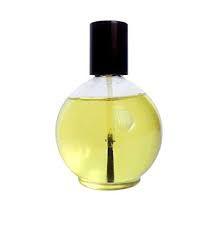
To create this Nail Art a while ago I was inspired by that ring in the picture.

I wanted to give a special touch to the neutrality of the leopard’s colors, so I made a sort of french, however, close to the cuticles.

I embellished it all with a gold glitter.

I made the recent version on a ballerina and the decorations were done with acrylic painting.

If you want you can watch the video where I create this nail art. I leave it HERE.

Drop

This nail art still reminds me of an ice cream or something that melts.

I chose two colors that I think together make a contrast that is harmonious at the same time.

This is the most recent version.

For both I used the same gel polishes.
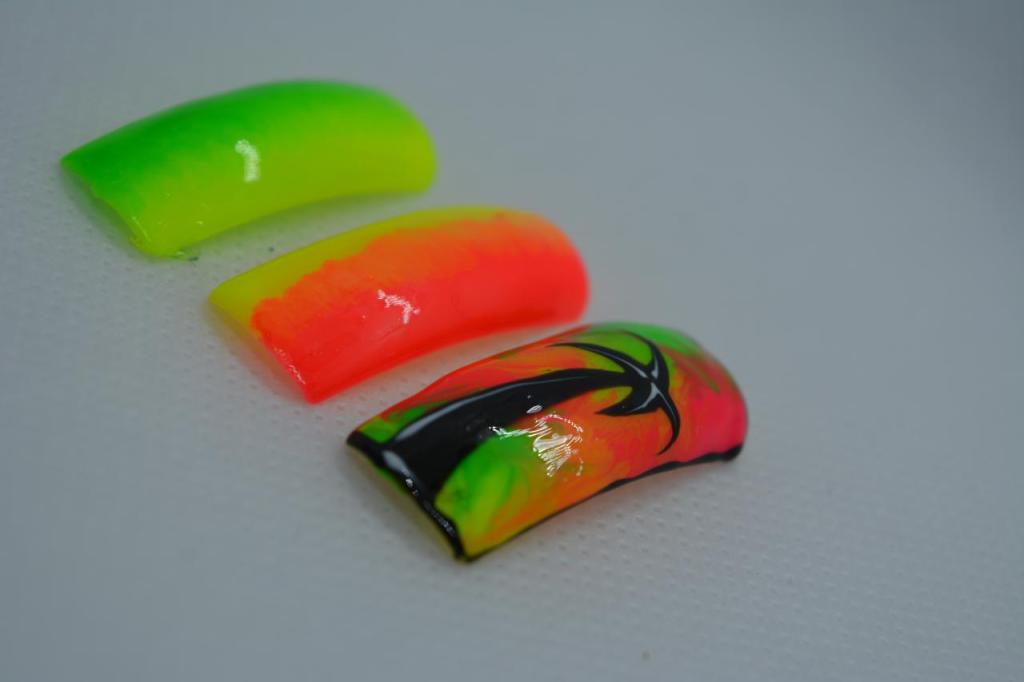
French Leopard

Yes, once again leopard spots 😂.

Often I did that design because with a simple dotter it was easy to create.

In this old photo I had created a slightly asymmetrical French, with bright colors such as white and fluorescent yellow. In contrast I placed black spots.

For the revised version I made a reverse french, using a gel cover.

The colors are the same and the spots are made with acrylic paint.
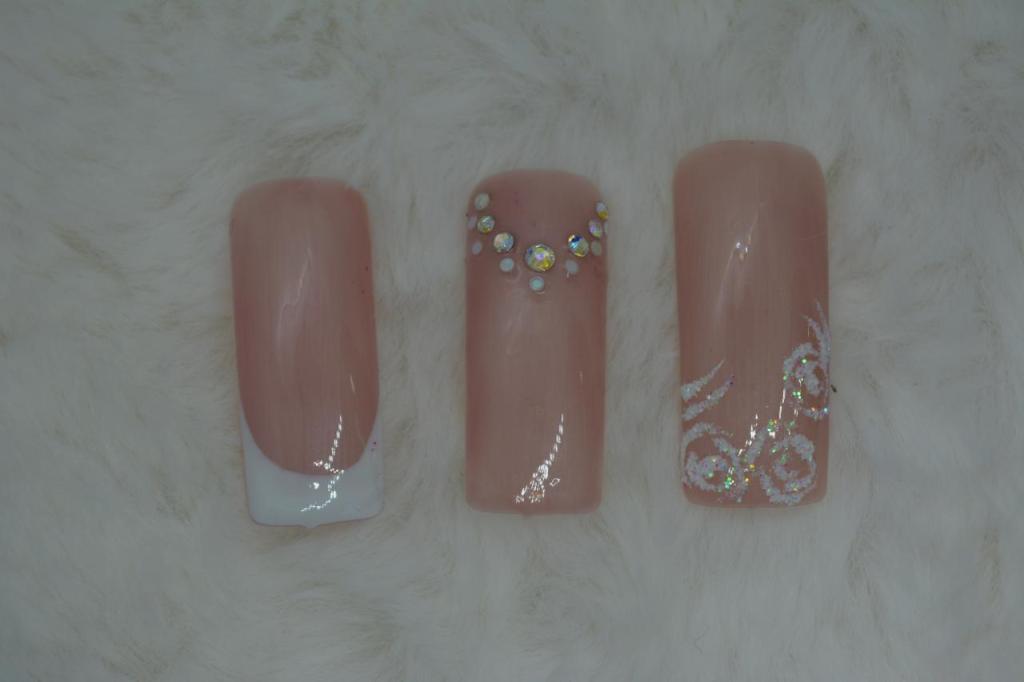
Flowers

Sometimes I changed style and I was more delicate.

Here, as a base, there is a shade of green and blue that are the background of flowers and their leaves.

To avoid leaving the void, I made some simple blue dots.

In the recent version I made it all with colored gels, and the flowers are finished with more delicacy and I also applied white, in order to create a little “reflection”.
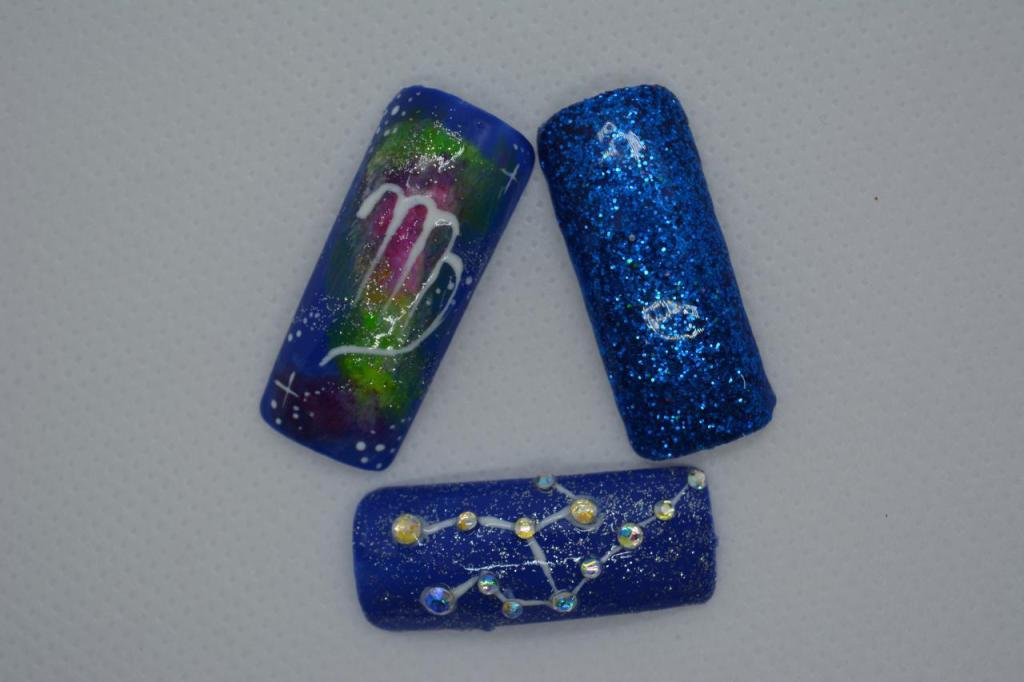
Blue Leopard

Let’s finish with another leopard design ahah.

This time, as a base, I created a shade of pink and pastel yellow.

I made the inside of the stain light blue to stand out on the lighter colors.

The new version I tried to make it better, making the spots finer and less round.

And that’s all, I hope you enjoyed my nails, if you want you can even make them yourself and if you’re interested, I’ll make others.

As always, if you want you can share and like this post.ù

On my instagram you can find the videos of Blue Leopard and Flowers.

See you soon!

SOFIA

Ricreo Vecchie Nail Art

Bentornati sul mio blog!

Nell’articolo Ciao Mi presento ho pubblicato alcune mie foto di vecchi lavori creati soprattutto con lo smalto.

Oggi ho deciso quindi di mostrare come ho reinterpretato e realizzato alcuni miei vecchi design!

Iniziamo!

Leopardo

Per creare questa Nail Art tempo fa ero stata ispirata proprio da quell’anello che è presente nella foto.

Ho voluto dare un tocco particolare alla neutralità dei colori del leopardo, quindi ho realizzato una sorta di french però vicino al girocuticole.

Ho impreziosito il tutto con un brillantino oro.

La versione recente la ho realizzata su una ballerina e i decori sono stati fatti con la pittura acrilica.

Se foste interessati alla realizzazione di quest’unghia, vi lascio qui il link al video.

Goccia

Questa nail art mi ricorda tutt’ora un gelato o comunque un qualcosa che si scioglie.

Ho scelto due colori che penso assieme facciano un contrasto che allo stesso tempo è armonioso.

Questa è la versione più recente.

Per entrambi ho usato gli stessi colori di semipermanente.

French Leopardo

Si, ancora una volta macchie leopardate 😂.

Spesso facevo quel design perchè con un semplice dotter era facile da creare.

In questa vecchia foto avevo realizzato un french un po’ assimmetrico, con colori luminosi quali il bianco e il giallo fluo. In contrasto ho apposto macchie nere.

Per la versione rivisitata ho realizzato una french inversa, usando un gel cover.

I colori sono gli stessi e le macchie le ho fatte con la pittura acrilica.

Prato Fiorito

A volte cambiavo stile e stavo sul più delicato.

Qui come base c’è una sfumatura di verde e azzurro che fanno da sfondo a dei fiori e le loro foglie.

Per evitare di lasciare il vuoto, ho realizzato dei semplici puntini blu.

Nella versione recente ho realizzato il tutto con i gel colorati, e i fiori li ho rifiniti con più delicatezza e ho apposto anche del bianco, in modo da creare un po’ di “riflesso”.

Leopardo Blu

Concludiamo con.. un altro design a leopardo ahah.

Questa volta come base avevo creato una sfumatura tra il rosa e il giallo pastello.

Il dentro della macchia l’ho fatto blu/azzurro per risaltare sui colori più chiari.

La versione nuova ho cercato di renderla migliore, facendo le macchie più fini e meno tonde.

E con questo è tutto, spero vi siano piaciute le mie unghie, se volete potete anche realizzarle a vostra volta e se vi interessa, ne realizzerò altri.

Prossimamente sul mio instagram pubblicherò un video dove mostro la realizzazione di Leopardo Blu e Prato Fiorito, seguitemi per non perderlo!

Come sempre se avete voglia condividete e lasciate un mi piace e alla prossima!

SOFIA

Compatibilità tra lampade e prodotti

Bentornati!

Oggi voglio parlarvi di un argomento molto importante, ovvero la scelta della lampada da usare rispetto ai prodotti usati e quindi la loro compatibilità.

Iniziamo.

Tipo di lampada

Esistono tre tipi di lampade, quelle UV, quelle LED e le lampade che combinano entrambi, le CCFL.

Questa differenziazione però è errata perché tutte producono raggi UV che servono a polimerizzare il prodotto.

Un tipo presenta dei bulbi che producono la luce.

Utilizzando queste lampade, i tempi di polimerizzazione sono più lunghi, dai 2 minuti in su.

Generalmente, anche nei saloni sono in disuso, data la lentezza della polimerizzazione.

Una cosa molto importante è la buona manutenzione della lampada. Quando si vede che i bulbi iniziano a fulminarsi, occorre sostituirli, per garantire sempre una corretta polimerizzazione.

La lampada CCFL presenta una spirale di bulbi e anche alcuni diodi led.

Essa serve per polimerizzare quei prodotti che possono essere usati sia con bulbi che con led.

C’è un altro tipo, il più comune recentemente, che invece dei bulbi, presenta dei diodi led che emettono raggi uv.

Queste lampade sono più versatili perchè più compatte e i tempi di polimerizzazione si accorciano di molto.

In genere si parte dai 30 secondi in su.

Molte di queste presentano anche la funzione “soft”, che serve per polimerizzare i prodotti più lentamente, con un aumento graduale di luminosità, in modo che non si percepisca la sensazione di bruciore sulle unghie.

Compatibilità Lampada / Prodotto

Davanti a questa scelta ci si può chiedere che lampada bisogna scegliere.

Il mio consiglio è quello di acquistare la lampada del brand di cui usate i prodotti.

I prodotti sono stati creati in modo che si polimerizzino sotto certe frequenze di luci, raggi uv etc.

I brand mettono a disposizione varie tipologie di lampade, in modo da rispettare le esigenze delle varie operatrici, che però vanno bene in abbinata ai prodotti.

Facendo un esempio pratico, se utilizzo i prodotti di Passione Unghie sarebbe meglio usare la lampada che vendono loro e non quella di Crystal Nails.

Ovviamente se si utilizza una lampada diversa non è che il prodotto non si asciughi o non diventi duro.

Allora perché dovremmo attenerci a questa regola?

Corretta Polimerizzazione

É importante eseguire una corretta polimerizzazione del prodotto, per vari motivi.

Innanzitutto per giusta polimerizzazione occorre mantenere in buono stato i bulbi / diodi delle lampade. Poi la mano deve essere inserita bene e dritta, in modo che i raggi raggiungano tutta la superficie delle unghie. Il pollice va sempre da solo. Infine devono essere rispettati i tempi di catalizzazione, che vengono riportati sulla scheda tecnica del prodotto.

Se non vengono rispettate queste regole oppure si usano dei buoni prodotti con una lampada comprata a 5 euro al mercato, si potrebbe incorrere in problemi.

Bisogna sapere che i prodotti che si utilizzano sulle unghie sono fortemente allergizzanti se usati scorrettamente, dunque bisognerebbe evitare il contatto con la pelle. Le allergie però si possono sviluppare anche tramite la polvere.

Se un prodotto non è ben polimerizzato, ma comunque risulta abbastanza rigido da poter essere limato, è molto più probabile recare allergie.

Non voglio spaventarvi, bensì farvi capire che rispettando queste poche e semplici regole si può evitare di creare un problema a noi stessi o agli altri.

Molto importante ovviamente è l’uso della mascherina antipolvere e una buona areazione dell’ambiente di lavoro.

Questo è un discorso fatto per chi vuole diventare una persona professionale, che si preoccupa della propria salute ma anche di quella delle clienti.

Detto ciò spero che questo articolo vi sia piaciuto e vi abbia reso più consci sull’importanza dell’avere la lampada giusta per i prodotti.

Se questo articolo vi è piaciuto lasciate un like e condividete.

Non dimenticate di seguirmi su Instagram e sul mio canale YouTube!

SOFIA

Nail Art for special occasions

Hi everyone!

Today I come back with an article that will show you various nail art.

As a theme, I chose special occasions , or those occasions when you need to show off your impeccable nails!

Let’s start!

Wedding

The first special occasion that came to mind is that of Wedding

I thought of pairing , with a hypothetical white and candid dress, the elegance of the French manicure.

Among the brides, in fact, French manicure is very popular, because it always remains classy and you never get tired of it. I also created with the same color tones roses that I then sprinkled with glitter, to create a shiny sugar effect.

In order not to make the other two too flat, I chose to apply rhinestones that capture the light on a pink nail.

Watchword: Elegance

Birthday

Another important circumstace to celebrate is that of birthday.

Probably on your birthday you would like the nails combined with the dress to wear. But I wanted to stay general, choosing to create this nail art a little starry.

As we all know, every birth date corresponds to a zodiac sign.

I combined a simple glittery nail with the stylized representation of the sign, but also with the constellation.

I designed the sign of the Virgin, because I was born in September, but obviously you can recreate it with all the other eleven.

Watchword: Sparkle

Christmas

I know, I know, we are in the middle of July and we die from the heat, but how could I exclude Christmas? 😂

At Christmas nail technicians will be filled with typical requests , such as red, white, green and Santa’s little drawing, and the star etc. ..

Following this thread I created white stars with a sugar effect on a red background, a candy stick and the writing ‘Merry Christmas‘(Buon Natale in Italian), studded with silver glitter.

Watchword: Merry

Holidays

Even the departure for the holidays is a good excuse to show off flawless nails.

As I already mentioned in my article on summer nail art , the importance lies in the color tones. I opted for a Fluo color shade , contrasted with the black of the palm . If you think of holidays, the first thing that comes to mind is the sea, an island and coconut trees.

Watchword: Fluo Colors

These were my ideas, if you have other special occasions in mind, write me as well that I could make some more.

If you enjoyed this article, share it with whomever you want, see you soon!

SOFIA

Nail Art per ogni occasione

Ciao a tutti!

Oggi torno con un articolo che vi mostrerà varie nail art.

Come tema ho scelto le occasioni speciali, ovvero quelle occasioni in cui oltre all’abito e al trucco, bisogna sfoggiare delle unghie impeccabili!

Cominciamo!

Matrimonio

La prima occasione speciale che mi è venuta in mente è quella del matrimonio.

Ho pensato di abbinare, ad un ipotetico bianco e candido vestito, l’eleganza del french.

Tra le spose infatti il french è molto popolare, perché rimane sempre fine e non stufa mai. Ho anche realizzato con la stessa tonalità di colori delle rose che ho poi cosparso di glitter, per creare un luccicante effetto zucchero.

Per non rendere troppo piatte le altre due, ho scelto di applicare su un’unghia tutta rosa degli strass che catturano la luce.

Parola d’ordine: Eleganza

Compleanno

Un altro momento importante e da festeggiare è quello del compleanno.

Probabilmente al proprio compleanno si vorrebbero le unghie abbinate al vestito da indossare. Però sono voluta restare sul generale, scegliendo di creare questa nail art un po’ stellata.

Come tutti sappiamo, ad ogni data di nascita corrisponde un segno zodiacale.

Ho abbinato una semplice unghia glitterata, alla rappresentazione stilizzata del segno, ma anche a quella della costellazione.

Ho disegnato il segno della Vergine, perchè sono nata a Settembre, ma ovviamente si può ricreare con tutti gli altri undici.

Parola d’ordine: Scintillio

Natale

Lo so, lo so, siamo in pieno luglio e si muore dal caldo, però come potevo escludere il Natale? 😂

Le onicotecniche a Natale saranno riempite di richieste tipiche, tipo il colore rosso, bianco, verde e il disegnino di babbo natale, e la stellina etc..

Seguendo questo filo ho creato delle stelline bianche effetto zucchero su uno sfondo rosso, un bastoncino di zucchero e la scritta ‘Buon Natale‘, tempestata di brillantini argentati.

Parola d’ordine: Festosità

Vacanze

Anche la partenza per le vacanze è una buona scusa per sfoggiare delle unghie impeccabili.

Come già citavo nel mio articolo sulle nail art estive, l’importanza risiede nelle tonalità di colore. Ho optato per una sfumatura tra colori fluo, messa in contrasto con il nero della palma. Se si pensa alle vacanze la prima cosa che viene in mente è il mare, un’isola e le palme da cocco.

Parola d’ordine: Fluo

Queste erano le mie idee, se avete in mente altre occasioni speciali, scrivetemi pure che potrei realizzarne delle altre.

Se questo articolo vi è piaciuto, condividete pure con chi volete, un abbraccio e alle prossima!

SOFIA

Cuticle Oil, dear nail’s friend

Welcome back! After the last article I come back with a more informative one.

Today I want to talk about a product that is often overlooked or ignored: Cuticle Oil. Let’s start!

What is it

As the name suggests, this product is an oil created specifically to be applied on cuticles. Or rather on the skin around the nail, also called proximal nail fold.

I have specified because, because of the little information, we are convinced that the skin is called cuticle but it is not so. That’s the proximal nail fold, while the white portion that grows on the nail plate is the cuticle.

Soon I will write a more in-depth article on this nail element.

Features

These oils are created on purpose for the nails and surrounding skin.

You might think that a any oil could be fine to apply on the nail plate but it isn’t.

The nail composed by keratin has a porous surface that allows only certain molecules to penetrate inside.

If you want to save money, you might think that using the simple olive oil can help moisturize and strengthen your nails.

However, the surface of the nail plate prevents the larger molecules of olive oil to penetrate, and its use become useless.

This is why industries create suitable products, whose particles manage to penetrate both in skin and nails , making them useful.

cuticle oil

As an alternative to the oils created by the various brands, you can use the vegetable oils of Jojoba and Avocado. These have features that make them functional to the nails.

Function

What is then cuticle oil for?

It is additional nourishment to the nail .

As I already explained in the article on false myths nails get nourishment from blood vessels.

We can help them by applying with constancy these specific oils that will make our nails more flexible and nourished .

There is also a detail that not everyone knows.

It would be good to apply the oil not only at the end of a gel / acrylic or gel polish treatment, but throughout the duration of the treatment.

In doing so, the skin around the nail will always be hydrated and will not be particularly hard at the time of the refill, helping the work of the nail tech.

In addition the gel / acrylic will remain more flexible if oil is used, making the removal easier, after the hypothetical 3 weeks of the duration of the reconstruction.

For this reason nail techs are required to advise their customers on the use of the oil every day.

Advertising Stunt

Beware of products that say they nourish and strengthen your nails based on various vitamins or keratin.

As I said before, the nail only allows certain molecules to penetrate and you shouldn’t buy these products that applied above the nail claims miraculous results.

As I was saying on the article of the acrigel , the various companies try to inflate and exaggerate the results of their products, so that people can buy them.

There is no need to spend a lot of money on products that will then prove useless.

this is an exemple of ads stunts

With a few euros and a lot of consistency you can get much better results thanks to the use of cuticle oil.

In conclusion I advise everyone to use the oil daily, for the health and well-being of your nails.

I hope you enjoyed this article and as always if you want you can share it with whomever you want.

See you soon!

SOFIA


Olio per cuticole, alleato per le nostre unghie

Bentornati! Dopo l’articolo scorso, un po’ più leggero, torno con uno più informativo.

Oggi voglio parlarvi di un prodotto che spesso viene sottovalutato o ignorato: L’Olio per Cuticole. Iniziamo!

Cos’è

Come dice il nome stesso, questo prodotto è un olio creato apposta per essere applicato sulle cuticole. O meglio sul girocuticole.

Ho specificato perchè a causa della poca informazione siamo convinti che la pelle attorno alle unghie si chiami Cuticola. Non è così. Quello è il Girocuticole, mentre la porzione bianca che cresce sulla lamina ungueale è la Cuticola.

Prossimamente scriverò un articolo più approfondito su questo elemento dell’unghia.

Caratteristiche

Questi oli sono stati creati apposta per le unghie e la pelle circostante.

Si potrebbe pensare che un qualsiasi olio possa andare bene da applicare sulla lamina ungueale ma non è così.

L’unghia composta da cheratina ha una superficie porosa che permette solo a certe molecole di penetrare al suo interno.

Volendo andare al risparmio si potrebbe pensare che usare il semplice olio di oliva possa aiutare ad idratare e rinforzare le unghie.

La superficie della lamina però non riesce a far penetrare le molecole piuttosto grandi dell’olio d’oliva, e il suo utilizzo risulta inutile.

Per questo le industrie creano prodotti adatti, le cui particelle riescono a penetrare sia nella pelle che sulle unghie, rendendoli utili.

Olio per cuticole

In alternativa agli oli creati dai vari brand si possono usare quelli vegetali di Jojoba e Avocado. Questi presentano caratteristiche che li rendono funzionali alle unghie.

Funzione

A cosa serve dunque l’olio per cuticole?

Esso è nutrimento aggiuntivo all’unghia.

Come già spiegavo nell’articolo sui falsi miti le unghie si procurano nutrimento dai vasi sanguigni.

Noi possiamo aiutarle applicando con costanza questi oli specifici che renderanno più flessibili e nutrite le nostre unghie.

Inoltre c’è un dettaglio che non tutti conoscono.

Sarebbe bene applicare l’olio non solo alla fine di un trattamento gel / acrilico o semipermanente, bensì durante tutta la durata del trattamento.

Così facendo la pelle del girocuticole sarà sempre idratata e non risulterà particolarmente dura nel momento del refill, facilitando il lavoro dell’operatrice.

In aggiunta il gel / acrilico rimarrà più flessibile se si utilizza l’olio, permettendo una rimozione facilitata dopo le ipotetiche 3 settimane di durata della ricostruzione.

Per questo le operatrici sono tenute a consigliare alle proprie clienti l’utilizzo dell’olio ogni giorno.

Trovate Pubblicitarie

Diffidate dai prodotti che dicono di nutrire e rinforzare le vostre unghie a base di varie vitamine o cheratina.

Come già dicevo, l’unghia permette solo a determinate molecole di penetrare e questi prodotti che si applicano al di sopra e promettono risultati miracolosi non sono da acquistare. Come dicevo sull’articolo dell’acrigel, le varie aziende cercano di gonfiare e esagerare i risultati dei loro prodotti, in modo che la gente possa comprare.

Non è il caso di spendere decine di euro per prodotti che poi si riveleranno inutili.

Questo è un esempio di pubblicità

Con pochi euro e tanta costanza si possono ottenere risultati decisamente migliori grazie all’utilizzo dell’olio per cuticole.

In conclusione consiglio a tutti l’utilizzo giornaliero dell’olio, per la salute e il benessere delle vostre unghie.

Spero che questo articolo vi sia piaciuto e come sempre se avete voglia condividete con chi volete.

Se questo articolo vi è piaciuto lasciate un like e condividete.

Non dimenticate di seguirmi su Instagram e sul mio canale YouTube!

Alla prossima!

SOFIA

Fruits Nail Art

Hi everyone! Last week I brought some ideas regarding summer nail art. If you want to read it, click here.

Today I decided to focus on another subject: Fruits

I was inspired by this sunny period, to bring you more ideas for different designs.

Let’s start!

Peach

Citrus Fruits

Kiwi

Watermelon

Esotic Fruits

Red Fruits

Pear / Apple

Fruit Salad

Here are the ideas that most intrigued me.

I wanted to choose nail art both easy , but also more artistic . Some are stylized , while others are more realistic and have 3D elements .

I hope you enjoyed them, and if you want to recreate them, go ahead and share on my Instagram!

As the last time I leave you one of my job.

I decided to opt for a red and juicy watermelon! 🍉

See you soon!

SOFIA

Nail Art Frutta

Ciao a tutti! La scorsa settimana ho portato alcune idee per quanto riguarda nail art estive. Se volete leggerlo cliccate pure qui.

Oggi ho deciso di concentrarmi su un altro soggetto: La Frutta.

Sono stata ispirata da questo periodo di sole, per portarvi altre idee per diversi design.

Iniziamo!

Pesche

Agrumi

Kiwi

Anguria

Frutta Esotica

Frutti Rossi

Pera / Mela

Macedonia

Ecco le idee che mi hanno incuriosita maggiormente.

Ho voluto scegliere nail art sia più facili, ma anche più artistiche. Alcune sono stilizzate, mentre altre sono più realistiche e presentano elementi in 3D.

Spero vi siano piaciute, e se avete voglia di ricrearle fate pure e condividete sul mio Instagram!

Come l’altra volta vi lascio un mio lavoro!

Ho deciso di optare per una rossa e succosa anguria!🍉

Alla prossima!

SOFIA

Acrigel and Dual Form system: innovation or advertising stunt?

Hello everyone!

Today I want to talk about a new product and a new technique: polygel and polyform (or dual form).

We will see its features and if indeed it is a more practical and faster solution to the reconstruction with the nail form / tip.

What is it

Polygel or acrigel is a hybrid product, like gel polishes. It has characteristics of the gel but also of acrylic. It is modeled with a brush soaked in solution ,like acrylic ,but it cures in a lamp like a gel.

It is a very innovative product which in recent times has gained popularity.
In particular thanks to its use with polyforms.

Use with nail form

This product can be used without problems to create a structure with nail form . The rules of the structure will always be the same. I suggest to use it especially during the summer, period in which gel is more likely to leak and make the job less easy.
You can have the comforts of acrylic that is more solid and dense to work, but without being in a hurry for the product to polymerize in the air.

Use with polyform

Browsing on instagram I often find advertising about this new technique that involves the use of acrigel.
In practice you need to apply the product inside these concave tip and then simply apply them on the nail , polymerize and the work is done.

Or at least through videos they make it seem so easy and fast.
I also understand that those who produce these kits must sell as much as possible and advertise themselves, so I also understand why, through promotional videos, it seems more easy and accessible.

People will be convinced to try and buy the kit.

I leave a link of a post from a girl showing the use of dual forms, but if you search on YouTube you will find many tutorial.

But now I will explain my point of view, on this new technique.

Choice of polyform

Very important in any reconstruction is the choice of the right tip, nail form adaptation, in order to create the most natural and solid result possible .
It is not said that in all those prefabricated forms that they will sell us, there will be one suitable for us.

For example, by choosing a dual form that is too large, the product may deposit on the skin, creating lifts.

If it were too small, it would not include the whole portion of the nail well, weakening the structure.

I also remember that nail products must come into contact with the skin as little as possible, since they are highly allergenic.

Structure

Since this is a treatment that is designed to be easy and fast and which can be done at home , the creation of apex is not contemplated.
Once the polyform is attacked, polymerized and removed, the nail is ready. No Apex.

So how can it hold up such a structure?

It could last for luck, but there are more chances of reconstruction’s fragility.

Refill

You can imagine, however, that you managed to create a structure and that it lasted 3 weeks.
At this point how do we proceed to the regrow nail?
It is impossible not to make the refill, but those who buy these kits, I don’t think they thought of the possibility of having to fill the new portion of nail.

Watching the promotional videos, the time of filling the regrowth is not shown, so future customers will remain unaware of what to do.

I also believe that among all the procedures in the world of nail techs, the refill is the most important one that without a minimum of information cannot be performed.

So considering these points, I believe it is clear that acrigel as a product is excellent and versatile, but the use of polyforms is not recommended.
In my opinion it is all a misleading advertising.

Obviously as I have always said, in my articles I express my thoughts and if someone has found this method good, I am nobody to deny his words.

In this job everyone finds her favorite material and technique, and it is not said that a product is used by all nail technicians.

That said, I hope you enjoyed my article and I hope I have made you aware of this new technique.

If you liked the article, share it with whomever you want and see you soon!

SOFIA