Archivi tag: nailtech

French Manicure: All types of a timeless classic

Welcome back!

Today I want to talk about the best known nail art: French Manicure.

I will illustrate the various typologies and I will explain in short the realization, let’s start!
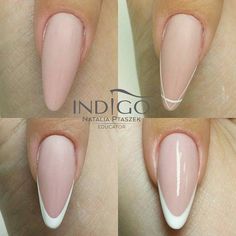
French in Surface

This is the easiest to make and in the salons it is the most common one, for the speed of realization.

This typology can be realized both with polish, gel polish, gel and acrylic.

This is because you can draw it on a nude toned color or pink base, the white edge on the tip.

Easy to make, in the salons it is often made also for the convenience in the removal, since it is drawn on the surface.
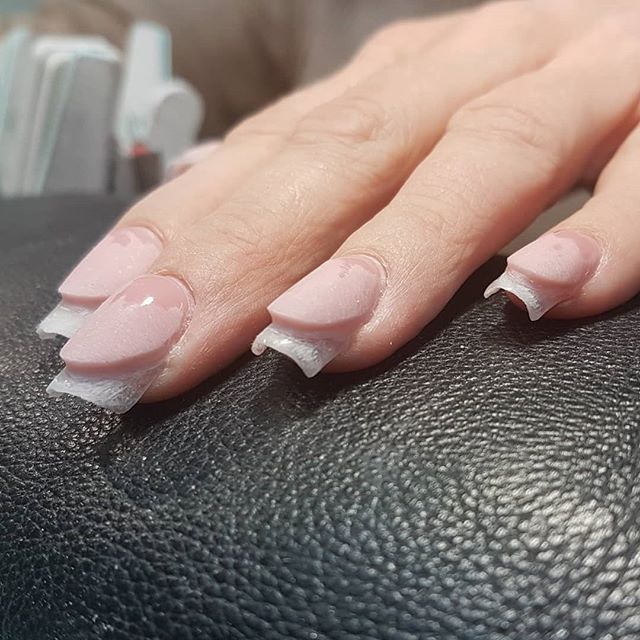
Deep French

The Deep French is achievable in combination with a reconstruction.

After performing the stretch, proceed using a white gel or acrylic builder to create the edge.

All this before creating the apex, for this it takes the name of deep.

So once you have drawn the edge with white, you can proceed with the structure above, with a clear builder.

This type of French is recommended for those with a rather long nail bed by nature.

Deep and Reverse French

The procedure of this type is very similar to the previous one, but has variations.

Also this must be created below the structure and on a stretch in gel or acrylic.

In addition, you need to create what is called a “wall”, with a gel cover.

The gel cover is pink and you need to create the inverse of the white edge.

Once you have created this guideline, just place the white builder next to the pink one and you’re done.

This technique is used to create French on nail beds with color alterations, or on the most extreme and long forms.

Both this type and the previous one require more time and in the refill they will never be completely eliminated, because below the structure itself.

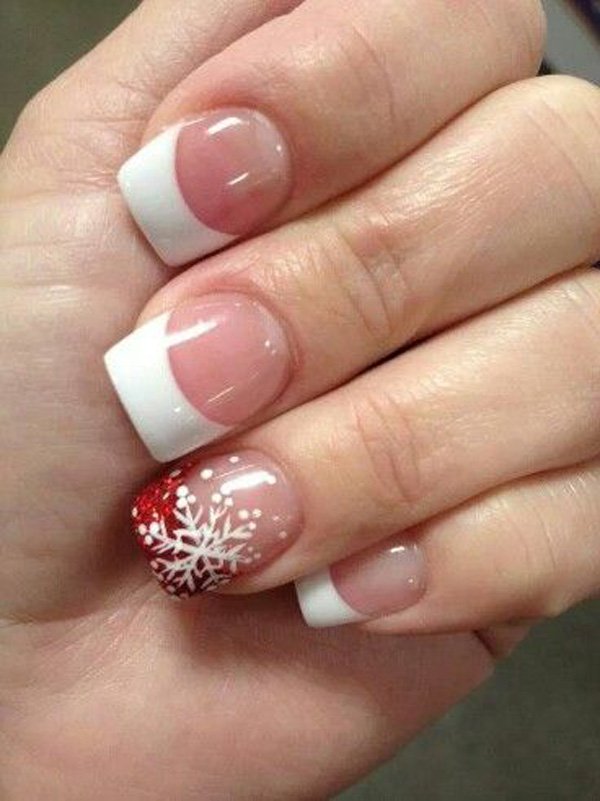
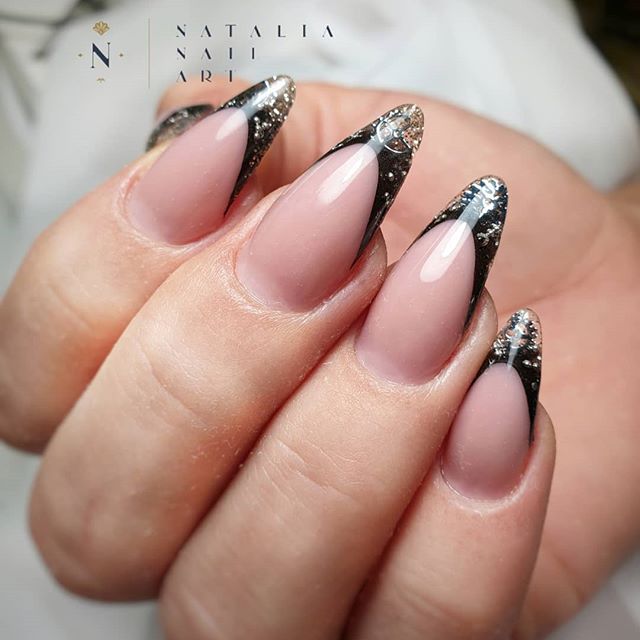
Speaking of french, we think of white to create the edge but of course we can choose the colors we prefer.

In the end the result should always be the same, without noticing the difference in technique used.

That’s all for today’s article, I hope I have clarified any doubts about the difference between the three techniques.

If you liked the article, share it and like it, see you soon!

SOFIA

French Manicure: Tutte le tipologie di un classico senza tempo

Bentornati!

Oggi voglio parlarvi della nail art e manicure più conosciuta: La French.

Illustrerò le varie tipologie e spiegherò in breve la realizzazione, iniziamo!

French Superficiale

Questa è la più facile da realizzare e nei saloni è quella più comune, per la velocità di realizzazione.

Questa tipologia si può realizzare sia con smalto, semipermanente, gel e acrilico.

Questo perchè basterà disegnare sopra una base color carne o rosa, la lunetta bianca in punta.

Facile da realizzare, nei saloni è realizzata spesso anche per la comodità nella rimozione, dato che è disegnata in superficie.

French Profonda

La French Profonda è realizzabile in abbinata ad una ricostruzione.

Dopo aver eseguito l’allungamento, si procede utilizzando un gel o acrilico builder bianco per creare la lunetta.

Tutto ciò prima di realizzare la bombatura, per questo prende il nome di profonda.

Quindi una volta disegnata la lunetta con il bianco, si può procedere con la struttura al di sopra, con un builder clear.

Questo tipo di French è consigliato a chi ha un letto ungueale piuttosto lungo di natura.

foto non mia

French Profonda e Inversa

Il procedimento di questa tipologia è molto simile a quella precedente, ma ha delle varianti.

Anche questa va creata al di sotto della bombatura e su di un allungamento in gel o acrilico.

In aggiunta bisogna creare quel che si chiama muretto, con un gel cover.

Il gel cover è rosa e bisogna creare l’inverso della lunetta bianca.

Una volta creata questa linea guida, basterà adagiare il builder bianco accanto a quello rosa e il gioco è fatto.

Questa tecnica è usata per creare french su letti ungueali con discromie, oppure sulle forme più estreme e lunghe.

foto non mia

Sia questo tipo che quello precedente richiedono tempi di realizzazione più lunghie e nel refill non verranno mai eliminati completamente, perchè al di sotto della struttura stessa.

Parlando di french, si pensa al bianco per reare la lunetta ma ovviamente ci si può sbizzarrire e scegliere i colori che più si preferiscono.

Alla fine il risultato dovrebbe essere sempre lo stesso, senza notare la differenza di tecnica usata.

Questo è tutto per l’articolo di oggi, spero di aver chiarito eventuali dubbi sulla differenza delle tre tecniche.

Se questo articolo vi è piaciuto lasciate un like e condividete.

Non dimenticate di seguirmi su Instagram e sul mio canale YouTube!

Alla prossima!

SOFIA

Glitter Applied in different ways on nails

Welcome back!

As promised today I bring the practical realization of what I wrote in the last article “How to apply glitter”

Let’s begin!

Glitter and Top Coat

In these first three nails I used the top coat and glitter method.

You can see how you can dose the quantity to create the desired effect.

It is also nice to experiment with color contrasts or even affinity.

Sugar effect

This is sugar effect.

I do not know if it can be perceived from the photo, but the nail is not sealed with any top coat, so as to make the grain of the glitter evident.


You can apply a color below similar to that of the glitters, or a white base to bring out the color of the glitter.

You can play with nuances and various effects.

Glass Effect

I made this nail on my hand, because I had to create this effect under the structure.

Glitter appears to be encapsulated and one can understand the depth they have.

They can be put in various colors and not just glitter, in fact I have also added ‘confetti’.

“Rain” glitter

It rained glitters, literally.😂

This effect is very beautiful because it enhances the glitter in all its fullness.

I don’t know, but I find it very satisfying to see the nails full of glitters✨.

This short article has come to an end

If you want to know how I made all this, I invite you to read my last article, today I showed the photos of that article.

If you liked this post, like it and share with anyone you want!

See you soon.

SOFIA

Glitter Applicati con vari metodi sulle unghie

Bentornati!

Come promesso oggi porto la realizzazione pratica di ciò che ho scritto nello scorso articolo Come applicare i glitter”.

Iniziamo!

Glitter e Top Coat

In queste prime tre unghie ho utilizzato il metodo top coat e brillantini.


Potete vedere come si può dosare la quantità per creare l’effetto desiderato.

È bello anche sperimentare con i contrasti di colori o anche affinità.

Effetto Zucchero

Questo è l’effetto zucchero.

Non so se dalla foto si possa percepire, però l’unghia non è sigillata con nessun top coat, in modo da rendere la grana del brillantino evidente.

Si può applicare un colore sotto simile a quello del brillantino, oppure una base bianca per far risaltare il colore del glitter
Si può giocare con le sfumature e vari effetti.

Effetto Sottovetro

Quest’unghia l’ho realizzata sulla mia mano, perché dovevo creare quest’effetto sotto la bombatura.

I brillantini sembrano incapsulati e si può capire la profondità che essi hanno.
Se ne possono mettere di vari colori e non solo brillantini, infatti io ho pure aggiunto dei ‘coriandoli’.

Glitter a “pioggia”

Ho fatto piovere glitter, letteralmente.😂

Questo effetto è molto bello perché esalta il glitter in tutta la sua pienezza.

Non so, ma trovo molto soddisfacente vedere le unghie piene di brillantini e sberluccicose✨✨.

Questo articolo breve è giunto al termine.

Se volete sapere come ho realizzato tutto cio, vi invito a leggere il mio ultimo articolo, oggi ho voluto solamente mostrarvi quanti effetti diversi si possono creare con una decorazione semplice come i glitter.

Se L’articolo vi è piaciuto, condividete pure e alla prossima!

SOFIA

How to apply Glitters

Welcome back!

Today I want to explain the various ways that exist to apply glitter on nails, giving various different effects.

In this article there will be no photos because I want to dedicate a special article to show the realization of what I will talk about today.

Let’s start!

Glitter and Top Coat

The first method I want to talk about is one of the simplest.

In practice you have to use a transparent top coat, put it on a plane where we can then take it again and add glitter, as you like.

This is a very comfortable trick because it allows us to create glittery color, without buying it.

Using this technique you can decide which and how many colors to use, but above all the amount of glitter we want.

If we wanted to get a glimpse of the color below, we put less glitter, but if we wanted to completely cover the nail, then it abounds with glitter.

Sugar effect

This is a very special effect because it highlights the glitter texture.

In fact, you can feel the roughness of glitters.

To achieve this effect you need to get a color without dispersion or a top coat without dispersion.

Start by applying the color without dispersion or the color at will and then the top coat and without polymerizing cover the nail with glitter.

After curing with a brush, remove the excess of glitters and you are done.

Glass Effect

This is another method of using glitter.

It consists of applying the glitter before creating the structure.

So after creating the lenght you desire, apply the glitter on the dispersion and then create the structure.

This is a nice effect because you can see the depth of the glitter.

“Rain” glitter

Forgive this pun, I didn’t know how else to explain it 😂.

In practice, after applying a color to our liking, drop the glitter with a rain-effect onto the nail, covering it completely.

Once cured, apply a top coat, preferably quite liquid, on top so that it penetrates well between the glitter particles. After this step you pass over the classic top coat.

This method allows you to have the beauty of glitter, but without perceiving its grain, unlike the sugar effect.

These are the main ways to apply glitter, I hope I have been helpful and in the Sunday article I will show you the various results you can get.

If you liked this article like it and share it. See you soon!

SOFIA

Come applicare i Glitter

Bentornati!

Oggi voglio spiegare i vari modi che esistono per applicare i glitter sulle unghie, dando vari effetti differenti.

In questo articolo non ci saranno foto perchè voglio dedicare un articolo apposito a mostrare la realizzazione di ciò di cui parlerò oggi.

Iniziamo!

Glitter e Top Coat

Il primo metodo di cui voglio parlarvi è uno dei più semplici.

In pratica bisogna utilizzare un top coat trasparente, metterlo su un piano in cui poi possiamo prelevarlo nuovamente e aggiungere i nostri glitter, a piacimento.

Questo è un trucco molto comodo perchè ci permette di creare il nostro colore glitterato,senza però acquistarlo.

Utilizzando questa tecnica si può decidere quali e quanti colori utilizzare, ma soprattutto la quantità di glitter che vogliamo.

Se volessimo far intravedere il colore al di sotto, si mettono meno glitter, se invece si volesse ricoprire completamente l’unghia, allora si abbonda con i glitter.

Effetto Zucchero

Questo è un effetto molto particolare perchè evidenzia la texture del glitter.

Infatti si potrà sentire il ruvido del brillantino.

Per realizzare questo effetto bisogna procurarsi un colore senza dispersione o un top coat sempre senza dispersione.

Si comincia applicando il colore senza dispersione oppure il colore a piacimento e in seguito il top e senza polimerizzare si ricopre l’unghia con i glitter.

Dopo aver polimerizzato con una spazzolina si rimuovono i glitter in eccesso ed è fatta.

Effetto Sottovetro

Questo è un altro metodo di utilizzo dei glitter.

Consiste nell’applicare i brillantini prima di creare la struttura.

Dunque dopo aver creato l’allungamento, si applicano i glitter sulla dispersione e in seguito si crea la struttura.

Questo è un bell’effetto perchè si percepisce la profondità dei glitter.

Glitter a “Pioggia”

Perdonate questo gioco di parole, non sapevo come altro spiegarlo 😂.

In pratica dopo aver applicato un colore a nostro piacimento, si fanno cadere i glitter a pioggia sull’unghia, ricoprendola completamente.

Una volta polimerizzato, si applica al di sopra un top coat, possibilmente piuttosto liquido, in modo che penetri bene tra le particelle dei glitter. Dopo questo passaggio si passa sopra il classico top coat.

Questo metodo permette di avere la bellezza dei brillantini, senza però percepirne la loro grana, a differenza dell’effetto zucchero.

Questi sono i modi principali di applicare i glitter, spero di esservi stata utile e nell’articolo di domenica vi mostrerò i vari risultati che si possono ottenere.

Se questo articolo vi è piaciuto mettete mi piace e condividete. Alla prossima!

SOFIA

Nail Art for every fabric

Welcome back!

Today I want to offer you new Nail Art, and this time I used various fabrics as inspiration.

Let’s start!

Pois

Let’s start with the simple and classic polka dot fabric.

Creating it is very simple. Simply lay out a color at will as a base and then perform the dots with order, and you’re done!

Tartan

Tartan is the typical Scottish fabric.

There are many variations, with red, green etc,

I chose to recreate the one on beige.

The fundamental point of this fabric is the straight lines and crosses, which create a beautiful harmony between them.

Lace

From simple things we move on to the elegance of lace.

Obviously, unless you use stencils, recreating the intricate and subtle stitching of the lace is a bit difficult.

However, doodles and arabesques can be made on a pink base, so as to bring out the black.

Pied de poule

Hen’s foot, for friends 😂.

This fabric plays on the contrast between black and white, to bring out the texture.

It is very simple to make, on the internet there are many tutorials, but also very effective.

Macramè

I will end with a fabric very similar to lace, macramé.

Its processing is very similar, but is generally light in color.

This fabric reminds me a lot of summer, due to its freshness and its light color.

We have come to the end.

I hope you enjoyed these ideas and if by chance you would like to see more, tell me that I will make them.

If you liked the article, like it and share it!

See you soon!

SOFIA

Nail Art per ogni tessuto

Bentornati!

Oggi voglio proporvi nuove Nail Art, e questa volta come ispirazione ho preso in considerazione vari tessuti.

Iniziamo!

Pois

Cominciamo con il semplice e classico tessuto a Pois.

Ricrearlo è molto semplice. Basta stendere un colore a piacimento come base e poi eseguire i puntini con ordine, e il gioco è fatto!

Tartan

Il tartan è il tipico tessuto scozzese.

Ne esistono molte varianti, con il rosso, il verde etc,

Io ho scelto di ricreare quello sul beige.

Il punto fondamentale di questo tessuto sono le linee dritte e gli incroci, che creano una bella armonia tra di loro.

Pizzo

Da cose più semplici passiamo all’eleganza del pizzo.

Ovviamente a meno che non si usino degli stampini, ricreare le intricate e sottili cuciture del pizzo risulta un po’ difficile.

Però si possono realizzare ghirigori e arabeschi su una base rosa, in modo da far risaltare il nero.

Pied de poule

Zampa di gallina, per gli amici 😂.

Questo tessuto gioca sul contrasto tra il nero e il bianco, in modo da far risaltare la trama.

Da realizzare è molto semplice, su internet si trovano molti tutorial, ma anche molto ad effetto.

Macramè

Concludo con un tessuto molto simile al pizzo, il macramè.

La sua lavorazione è molto simile, ma in genere è di colore chiaro.

Questo tessuto mi ricorda molto l’estate, per via della sua freschezza e del suo colore chiaro.

Siamo giunti alla fine.

Spero che queste idee vi siano piaciute e se per caso voleste vederne altre, ditemi pure che le realizzerò.

Se l’articolo vi è piaciuto lasciate un mi piace e condividete!

Alla prossima!

SOFIA

Difference between monophasic and triphasic gel

Welcome back!

Today I want to talk about gel, and in particular I want to explore the difference between monophasic and triphasic.

Let’s start!

Monophasic

The monophasic builder gel, is a product that as the name implies, is used to make the structure.

With monophasic we mean that this product has been designed to be able to enclose the 3 fundamental products for a correct reconstruction in a single “jar”: Base, Builder, Top Coat.

For the correct use of each step, please refer to the product technical data sheet.

These products are the most practical because with one you can do everything.

Triphasic

Like the monophasic, the Triphasic is a gel used to create the structure.

But unlike the first, it ONLY serves to create the structure.

You have to combine them with a base and a top coat.

Also for this product it is better to read the technical sheet, in order to guarantee a good use.

Which one do I choose?

Obviously the choice between monophasic or three-phase depends on the needs of the operator.

I personally recommend the triphasic.

In these months in which I practiced, using the monophasic I undoubtedly performed the work faster, but after 3 weeks I noticed, despite a careful preparation of the nail, some lifts.

This is due to the fact that a product designed to cover three roles does so, but less accurately.

With the use of triphasic instead, combined with the correct base and excellent preparation of the nail, the reconstructions lasts longer without lifting.

This is because it was designed only for a task, to be a builder gel.

As I have often said on my blog, each operator chooses the product she is best at, what I say is not law and I base everything on my personal experience and my studies.

I therefore hope to have eliminated the doubts about the difference between monophasic and triphasic, and if you would like to ask me something, go ahead, I will be available to answer you.

That said, if you liked the article, please share it, like it and see you soon!

SOFIA

Differenza tra monofasico e trifasico

Bentornati!

Oggi voglio parlare di gel, e in particolare voglio approfondire la differenza tra monofasico e trifasico.

Iniziamo!

Monofasico

Il gel costruttore monofasico, è un prodotto che come dice il nome, serve per fare la struttura.

Con monofasico si intende che questo prodotto è stato studiato per poter racchiudere in un unico “barattolo” i 3 prodotti fondamentali per una corretta ricostruzione: Base, Costruttore, Top Coat.

Per il corretto utilizzo di ogni step, bisogna fare riferimento alla scheda tecnica di prodotto.

Questi prodotti sono i più pratici perché con uno si può fare tutto.

Esempio di barattolo di gel monofasico

Trifasico

Come il monofasico, il Trifasico è un gel che serve per creare la struttura.

Però a differenza del primo, esso serve SOLO per creare la struttura e gli allungamenti.

Bisogna obbligatoriamente abbinarli ad una base e ad un top coat.

Anche per questo prodotto è meglio leggere la scheda tecnica, per poter garantire un buon utilizzo.

Quale Scegliere?

Ovviamente la scelta tra monofasico o trifasico dipende dalle esigenze dell’operatrice.

Io personalmente consiglio il trifasico.

In questi mesi in cui mi sono esercitata, usando il monofasico ho eseguito il lavoro indubbiamente più velocemente, ma dopo 3 settimane notavo, nonostante un’accurata preparazione dell’unghia, dei sollevamenti.

Questo è dovuto al fatto che un prodotto studiato per ricoprire tre ruoli, lo fa, ma meno accuratamente.

Con l’utilizzo del trifasico invece, abbinato alla corretta base e ad un’ottima preparazione dell’unghia, le ricostruzioni duravano maggiormente senza sollevamenti.

Questo perchè è stato studiato solo per un compito, quello di essere un gel costruttore.

Come ho spesso detto sul mio blog, ogni operatrice sceglie il prodotto con cui si trova meglio, ciò che dico io non è legge e baso tutto sulla mia esperienza personale e sui miei studi.

Spero dunque di aver eliminato i dubbi sulla differenza tra monofasico e trifasico, e se voleste chiedermi qualcosa, fate pure, sarò disponibile a rispondervi.

Detto ciò, se l’articolo vi è piaciuto condividete pure, mettete mi piace e al prossimo articolo!

SOFIA