Today we are talking about this new technique which has been making its way for some time.
Let’s begin!
What’s this
This technique offers a natural look on the nails, as if you were wearing the gel polish, but also more resistant, as if it were a gel coating.
In addition, it can be removed by dissolving it and does not require filing of the structure.
This treatment is recommended for those who want to wear gel polish but have brittle nails.
We know that gel polish on problematic nails does not have excellent adhesion, so you can opt for this new procedure.
What is needed
To achieve this, specific bases must be purchased.
By now almost all brands have them, and these are thicker and fuller bases, which allow you to easily create a small reinforcement on the nail.
Some brands also create these products to create small stretches, of maximum 3 millimeters.
Pocedure
After preparing the nail with the preparers indicated by the company, a thin base layer is created first, so that the product that we will apply later can slide.
Without catalyzing, a greater quantity of gel polish is applied, to create what could be a small apex, in order to guarantee maximum resistance.
In general, these products are very self-leveling and create the structure themselves.
So once catalyzed there should be no need to file, it is still recommended buffer in order to allow a better adhesion of the color.
In the end it is an excellent alternative to gel covers that have a slightly longer process.
Today’s article ends here, I hope it was useful.
If you want to see how to work this product, you can watch my latest video on my youtube channel, I leave you the link here.
If you liked this article, leave a like and share.
Oggi voglio parlare di un’argomento molto importante, la salute delle onicotecniche.
Questo lavoro ci porta a stare ore e ore sedute, spesso concentrate su un lavoro, tanto che non ci accorgiamo di alcune cattive posture o abitudini abbiamo.
Vedremo cosa è meglio e cosa non è meglio fare, per preservare la nostra salute, e soprattutto ad esempio, la sindrome del tunnel carpale.
Iniziamo!
1.
Dal momento che alcuni problemi possono incorrere dalla torsione scorretta, mantenete gli oggetti ben di fronte a voi, evitate di tendere ad un lato. Inoltre evitate di torcere anche il collo, come se stesse tenendo il telefono con una spalla. La testa dovrebbe essere tenuta dritta e le spalle rilassate.
2.
Evitate di allungarvi, per più di 30 cm, e mantenete gli avambracci paralleli al pavimento. Questa è detta “posizione neutrale”.
3.
Scegliete delle sedie di qualità, preferibilmente quelle rotanti, che abbiano la seduta un po’ più larga delle vostre cosce, e aggiustate la sua altezza, in modo che le cosce siano parallele al pavimento con tutta la superficie dei piedi che tocca per terra.
4.
Non incrociate le gambe e utilizzate tutta la seduta della sedia, senza sedersi lateralmente. Assicuratevi inoltre che essa sia ben imbottita, in modo da non creare pressione sulla parte posteriore delle gambe o ginocchia.
5.
Minimizzate altri punti di pressione, quindi non tenete le braccia sullo spigolo del tavolo. Potete usare della spugna o imbottiture sul bordo del tavolo, in modo da evitare tutto ciò.
6.
Evitate di pendere in avanti o indietro. La testa, il collo e il corpo dovrebbe essere ben dritto, senza torcersi o incurvarsi.
7.
Invece di torcere il vostro corpo, per lavorare, gentilmente posizionate la mano o il piede della cliente in modo che voi siate più confortevoli possibili. Durante le pedicure è importante usare sedie reclinabili che aiutano e supportano bene le gambe della cliente.
8.
Usa un cuscino, da appoggiare sulla zona lombare, in modo da allentare la pressione.
9.
Le mani e i polsi devono essere tenuti dritti, non piegati o storti lateralmente.
10.
Mentre tenete la mano o il dito della cliente, posizionatelo in modo che minimizzate la pressione della tenuta. Tenetela invece in modo delicato e rilassato, per ridurre lo sforzo.
Ecco qua, questi sono alcuni consigli che sicuramente vi faciliteranno il lavoro!
L’articolo di oggi finisce qui, se vi è piaciuto lasciate un like e condividetelo!
Today I want to talk about a very important topic, the health of nail technicians.
This job leads us to spend hours and hours sitting, often concentrated on a job, so much so that we don’t notice some bad postures or habits we have.
We will see what is better and what is not better to do, to preserve our health, and especially for example, carpal tunnel syndrome.
Let’s begin!
1.
Since some problems can occur from incorrect twisting, keep the objects well in front of you, avoid tending to one side. Also avoid twisting your neck, as if he were holding the phone with one shoulder. The head should be kept straight and the shoulders relaxed.
2.
Avoid stretching for more than 30 cm and keep your forearms parallel to the floor. This is called “neutral position”.
3.
Choose quality chairs, preferably the rotating ones, which have the seat a little wider than your thighs, and adjust its height, so that the thighs are parallel to the floor with the whole surface of the feet touching the ground.
4.
Do not cross your legs and use the whole seat of the chair, without sitting sideways. Also make sure that it is well padded, so as not to create pressure on the back of the legs or knees.
5.
Minimize other pressure points, so don’t keep your arms on the edge of the table. You can use sponge or padding on the edge of the table, in order to avoid this.
6.
Avoid leaning forward or backward. The head, neck and body should be straight, without twisting or bending.
7.
Instead of twisting your body, to work, kindly position the client’s hand or foot so that you are as comfortable as possible. During pedicures it is important to use reclining chairs that help and support the client’s legs well.
8.
Use a pillow, to be placed on the lower back, in order to release the pressure.
9.
Your hands and wrists should be kept straight, not bent or twisted sideways.
10.
While holding the client’s hand or finger, position it so that you minimize the pressure of the seal. Instead, keep it gently and relaxed to reduce strain.
Here you are, these are some tips that will surely make your job easier!
Today’s article ends here, if you liked it, leave a like and share it!
Oggi voglio proporvi una cosa divertente, ora vi spiego!
In questi giorni stavo pensando che spesso mi capita di parlare di unghie, prodotti e tecniche con persone, soprattutto uomini, che non se ne intendono, come per esempio il mio ragazzo o mio fratello.
A volte parlo di cose più difficili, altre di cose più facili, in tutto ciò non ho mai la certezza che sono ascoltata sul serio!🤣
Sono l’unica o anche voi condividete le vostre passioni con i vostri cari?
Allora mi è venuta in mente questa idea del quiz.
Sapranno rispondere a delle domande semplici (se veramente fino ad ora ci hanno ascoltato ahah) sul mondo delle unghie?
Quindi sul mio profilo instagram ho pubblicato delle storie interattive, dove potrete far rispondere alla persona in questione alle domande, e in base a quante risposte faranno corrette, otterranno un risultato!
Oggi voglio raccontarvi di un’esperienza a cui ho partecipato: il mio primo nail contest!
Iniziamo!
Cos’è
In generale un nail contest è una competizione amichevole tra tutte le onicotecniche o comunque ragazze che vogliono partecipare che sono appassionate al mondo delle unghie.
Dato che siamo tutti a casa, questo è un modo per svagarsi e concentrare le nostre forze su un qualcosa che ci appassiona.
Io tra i tanti concorsi che c’erano, ho deciso di partecipare a quello di Valentina Colonna, in collaborazione con l’azienda che rappresenta, Mistero Milano.
Mi piaceva ciò che aveva proposto quindi ho scelto di partecipare e il tema era la Bellezza.
Ognuno poteva realizzare ciò che al meglio rappresentasse la bellezza e io mi sono data alla pazza gioia!
Prima proposta
Ecco le prime unghie che ho realizzato.
Sapete tutti che adoro il viola e quindi ho deciso di utilizzare questo bellissimo colore e realizzare una nail art semplice e ad effetto.
I fiorellini danno quel tocco di delicatezza e armonia in piu!
Seconda proposta
Sempre sulla stessa ricostruzione, dopo aver eliminato il vecchio colore, ho deciso di realizzare qualcosa di più complicato.
Io adoro dipingere, non solo le unghie, e nel mio tempo libero su delle tele creo dei paesaggi naturali.
Mi sono anche posta una sfida, ovvero se riuscivo a farlo su una superficie più piccola come le unghie, utilizzando la pittura acrilica.
Ho realizzato qualcosa di tropicale, che mi ricordasse l’estate, stagione che io adoro.
Today I want to tell you about an experience in which I participated: my first nail contest!
Let’s begin!
What’s this
In general, a nail contest is a friendly competition between all nail technicians or girls who want to participate who are passionate about the world of nails.
Since we are all at home, this is a way to relax and focus our strength on something we are passionate about.
Among the many competitions that were there, I decided to participate in that of Valentina Colonna, in collaboration with the company it represents, Mistero Milano.
I liked what she proposed so I chose to participate and the theme was Beauty.
Everyone could achieve what beauty best represented and I gave myself to crazy joy!
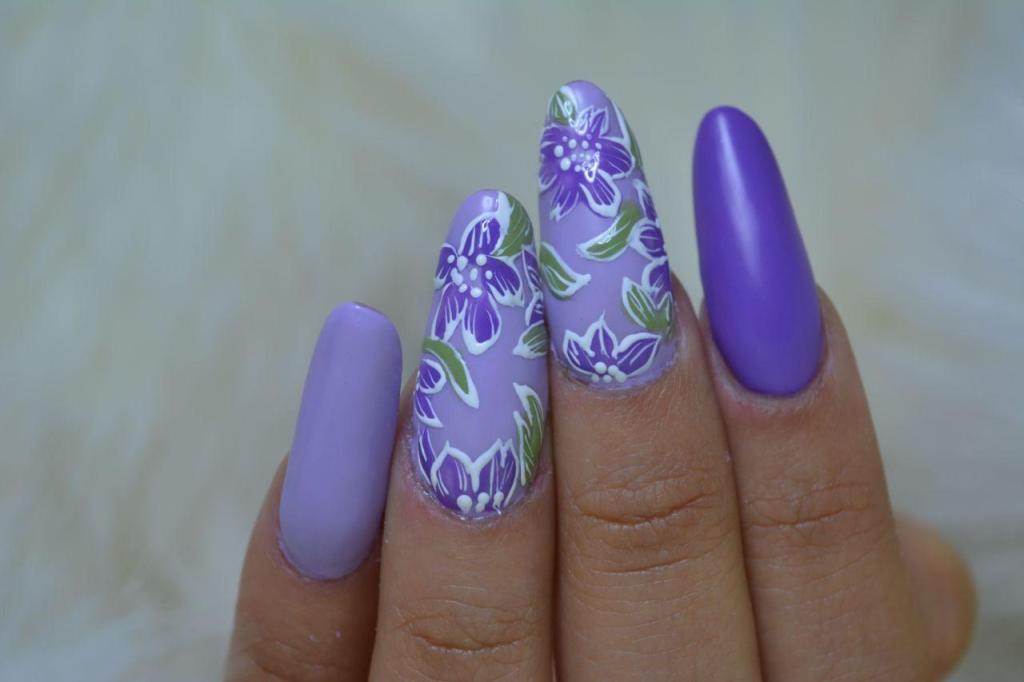
First idea
Here are the first nails I made.
You all know that I love purple and therefore I decided to use this beautiful color and create a simple and effective nail art.
The flowers give that extra touch of delicacy and harmony!
Second idea
Still on the same reconstruction, after eliminating the old color, I decided to make something more complicated.
I love painting, not only nails, and in my free time I create natural landscapes on canvases.
I also asked myself a challenge, that is, if I could do it on a smaller surface like nails, using acrylic paint.
I made something tropical, which reminded me of summer, a season that I love.
If you want to know how to use acrylic paint on nails, read this article.
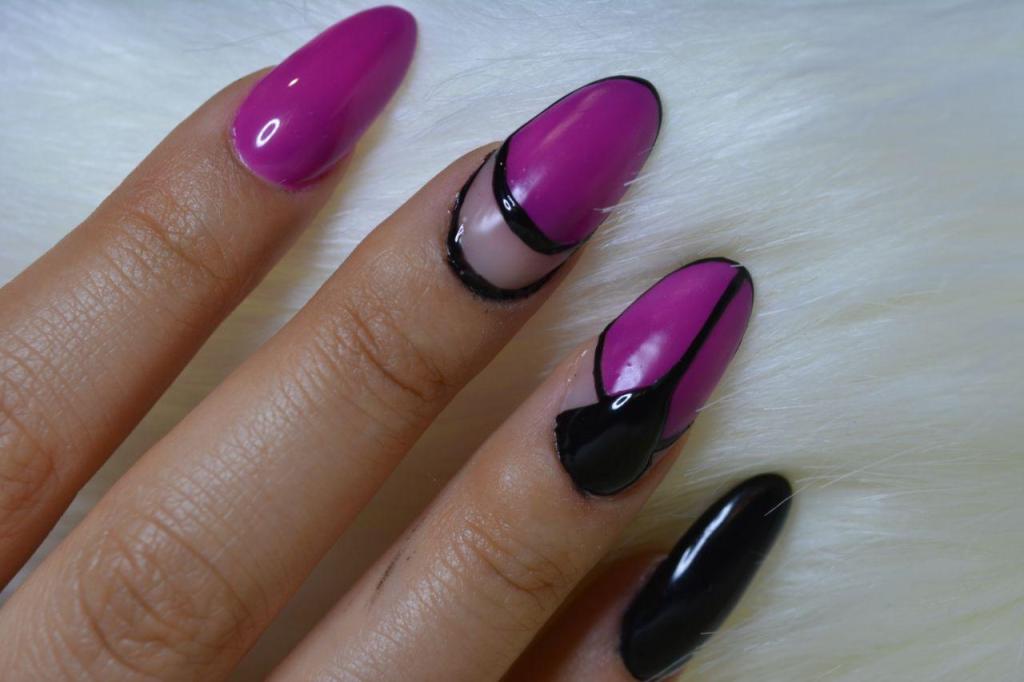
Third idea
Beauty also lies in the most geometric and abstract things.
So always using a shade of purple, on a shorter almond, I created this decoration, simple but linear.
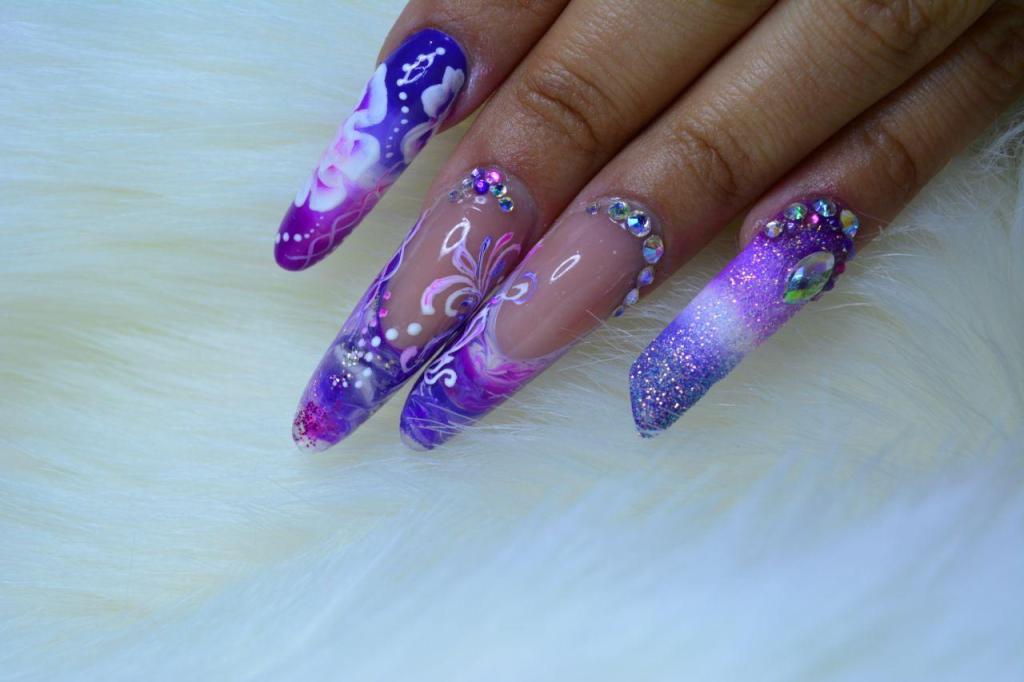
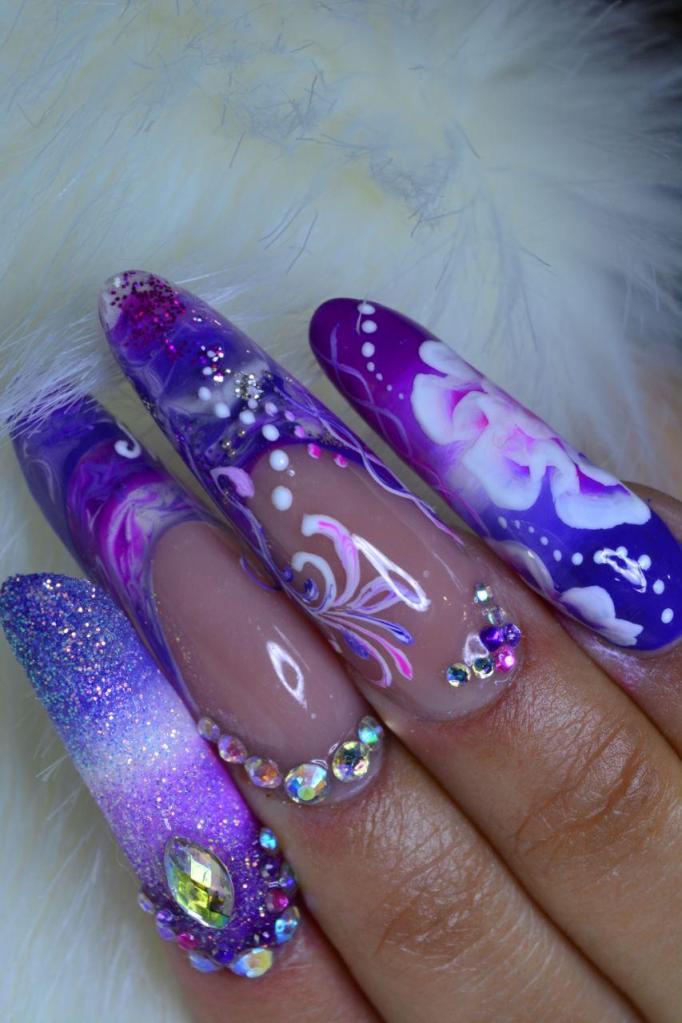
Fourth idea
Well I thought I wanted to combine everything I like on the nails.
Violet, glitter, swaroski, extreme shapes etc ..
And this is what came out of it.
It took me 5 hours, because it was a complex enough thing to do, but I am very satisfied with it and I really like it.
Here are my proposals for a contest, be free to take all the ideas you want!
Do you like them?
If you liked this article, leave a like and share.
Oggi voglio discutere di un argomento di cui si sente parlare spesso, ovvero se comprare i prodotti per le unghie dalla Cina sia sicuro.
Iniziamo!
Controlli di sicurezza
Qualsiasi prodotto che viene importato dalla Cina deve aderire a delle regolamentazioni di sicurezza che rispettino il paese in cui entrano.
Questi prodotti durante il trasporto viaggiano con un certificato di conformità che deve essere controllato non appena fanno ingresso.
Se il prodotto non crea sospetti, allora viene immesso senza problemi in commercio, mentre se c’è qualche dubbio sulla merce, allora si interviene.
Il prodotto viene messo in una sorta di quarantena, in modo da essere controllati e testati, in modo da capire se sono sicuri o no.
Nel caso non li fossero semplicemente vengono o distrutti o rispediti al paese di provenienza.
Comunque generalmente parlando potete stare tranquilli, perchè i prodotti facilmente accessibili sono sicuramente sicuri.
Molte persone utilizzano magari colori o altri prodotti provenienti dalla Cina e non hanno riscontrato nessun problema.
Cambio etichetta
Alcuni venditori, per immettere sul mercato sostanze illegali, cambiano l’etichetta del prodotto.
Invece di inserirne una che corrisponda a ciò che c’è nella marce, ne mettono un’altra falsa.
Ciò può ingannare sia la persona che vuole importare i prodotti, sia le autorità che li controllano.
Per questo è importante, in qualsiasi ambito, acquistare un qualsiasi prodotto da un rivenditore affidabile, che si preoccupi di controllare l’integrità di essi.
Fortunatamente grazie a internet possiamo leggere recensioni sul venditore da cui desideriamo acquistare oppure sul prodotto stesso.
Questo scambio di informazioni è molto importante per evitare di rimanere fregati.
Comunque è sconsigliato comprare prodotti direttamente dal mercato cinese e poi importarli tu stesso, perchè probabilmente non avrai le capacità di capire se un prodotto è valido o no, non saprai mai cosa ti capita per le mani.
Prodotti contraffatti
Un altro problema, ma ciò non riguarda solo la Cina, è quello dei prodotti contraffatti.
Noi pensiamo di acquistare il prodotto originale, ma molto spesso sono solo una copia molto più economica, perchè non sono prodotti nelle giuste condizioni igieniche, oppure i materiali usati sono nocivi e scadenti.
Per evitare ciò, controllate se il venditore è affidabile, e cosa molto importante, acquistate prodotti solo da rivenditori autorizzati.
In conclusione, con le giuste accortezze, i prodotti cinesi sono validi, l’importante è informarsi sul venditore da cui compriamo e far attenzione che sia autorizzato e affidabile.
Ciò vale per qualsiasi prodotto comunque, non solo quelli provenienti dalla Cina.
Spero che questo articolo vi sia piaciuto, lasciate un like e condividete.
Today I want to discuss a topic that you often hear about, namely whether buying nail products from China is safe.
Let’s start!
Security checks
Any product that is imported from China must comply with safety regulations that respect the country in which they enter.
These products during transport travel with a certificate of conformity which must be checked as soon as they enter.
If the product does not create suspicions, then it is placed on the market without problems, while if there is any doubt about the goods, then action is taken.
The product is put in a sort of quarantine, in order to be checked and tested, in order to understand if they are safe or not.
If they are not, they are simply destroyed or sent back to the country of origin.
However, generally speaking, you can rest assured, because easily accessible products from China are certainly safe.
Many people are probably using colors or other products from China and have not encountered any problems.
Change of label
To sell illegal substances, some sellers change the product label.
Instead of inserting one that matches what’s in the gear, they put another fake one.
This can fool both the person who wants to import the products and the authorities that control them.
For this reason it is important, in any context, to purchase any product from a reliable retailer who is concerned with checking the integrity of the products.
Fortunately, thanks to the internet, we can read reviews on the seller we want to buy from or on the product itself.
This exchange of information is very important to avoid being screwed.
However, it is not recommended to buy products directly from the Chinese market and then import them yourself, because you probably won’t have the ability to understand if a product is valid or not, you will never know what you will buy.
Counterfeit products
Another problem, but this does not concern only China, it is that of counterfeit products.
We think of purchasing the original product, but very often they are only a much cheaper copy, because they are not produced in the right hygienic conditions, or the materials used are harmful and poor.
To avoid this, check if the seller is reliable, and very importantly, buy products only from authorized dealers.
In conclusion, with the right precautions, the Chinese products are valid, the important thing is to inquire about the seller from whom we buy and make sure that it is authorized and reliable.
This applies to any product, however, not just those from China.
I hope you enjoyed this article, leave a like and share.
Oggi voglio mostrarvi i risultati di una sfida che mi sono posta.
La scorsa volta ho realizzato un’unghia lunghissima, di 10 cm, vi lascio qui il link del video.
Questa volta mi sono concentrata sul tempo di realizzazione.
Ho scelto di ricostruire in cartina tre unghie, con tempo diverso: una in un’ora, una in 30 minuti e una in 10 minuti.. si avete letto bene, continuate a leggere per sapere com’è finita.
Iniziamo!
1 Ora
Durante la realizzazione di quest’unghia mi sono presa tutto il tempo che mi serviva, per fare un lavoro preciso.
Ho eseguito la preparazione dell’unghia usando 3 punte fresa, per rimuovere le cuticole e opacizzare la superficie delle unghie, ho usato una lima delicata per dare forma e opacizzare ulteriormente la lamina.
Ho applicato tutti e tre i preparatori e misurato con estrema cura la cartina, in modo da metterla più correttamente possibile.
Ho applicato una base utilizzando un pennellino sottile e rispettato i tempi di polimerizzazione.
Ho quindi eseguito l’allungamento con il gel, pinzato e catalizzato.
Ho quindi rimosso la cartina ed eseguito la struttura.
Ho scelto di limare con la lima perchè tanto avevo parecchio tempo e volevo avere il massimo controllo su ciò che stavo facendo.
Una volta finito di limare sono passata al colore.
Ho steso con estrema cura due mani di colore rosa, raggiungendo il giro cuticole con un pennellino molto sottile, senza mai toccare la pelle.
Una volta catalizzato ho sgrassato il colore e passato delicatamente il buffer per opacizzare la superficie.
Ho realizzato quindi un french con il rosso, sono stata molto attenta a farlo preciso.
Ho catalizzato e creato un fiore e un ghirigoro, andando in seguito in lampada.
Stava per terminare la mia ora, ho quindi applicato al centro del fiore una perla e sigillato con un lucido con dispersione.
Una volta sgrassato ho applicato l’olio per cuticole ed ecco l’unghia realizzata in 1 ora.
Vi piace? Io sono abbastanza soddisfatta del risultato.
30 minuti
Per realizzare quest’unghia avevo abbastanza tempo ma non troppo per perdermi nei dettagli.
Il procedimento che ho eseguito è lo stesso di prima ma un po’ più veloce ed eliminando alcune cose.
Ho saltato l’opacizzazione dell’unghia con la lima, ho limato con la fresa la struttura in modo da essere un po’ più veloce.
Il colore l’ho steso senza però utilizzare il pennellino fine.
Ho realizzato il french, però non sono stata precisa come il primo e senza catalizzare ho realizzato già il fiore e il ghirigoro.
Ho applicato poi la mezza perla e un lucido senza la dispersione per essere più veloce.
Ho passato il lucido ed ecco fatto.
Allora come sono stata?
In generale non mi dispiace però avrei potuto limare maggiormente sui laterali per sgonfiare la struttura e sulla parte centrale il french è un po’ traballante.
Ora ci sarà da divertirsi.
10 minuti
Avete presente tutte le regole che si devono seguire per ricostruire in modo corretto un’unghia? Bene dimenticatele 😂
Ho fatto una corsa contro il tempo.
Ho opacizzato l’unghia con la lima velocemente, e misurato la cartina.
Quindi ho applicato il nail prep e il binder che è un po’ più veloce ad asciugarsi.
Ho messo la cartina e applicato il monofasico come base, senza catalizzare eseguo l’allungamento e anche la bombatura, allora mando in lampada.
Ovviamente il prodotto era parecchio e quindi un po’ andava dove voleva.
Ho limato velocemente con la fresa e sono passata al colore.
Non ho applicato il rosa e direttamente con il pennello del colore ho disegnato il french. Senza catalizzare ho fatto il fiore e il ghirigoro.
Catalizzo solo per 30 secondi e metto il lucido senza dispersione e sopra ci ho messo la mezza perla.
Catalizzo solo per 30 secondi e applico l’olio.
Ho finito giusto in tempo ed ecco qua il risultato finale.
Questa foto si commenta da sola.
Nonostante la avessi appena realizzata l’unghia presentava già sollevamenti, il french è sproporzionato, catalizzato male e anche il fiore non è ben fatto.
Quindi è possibile realizzare la ricostruzione di un’unghia in 10 minuti?
Sì, ma il risultato non sarà ben fatto.
Ecco le unghie a confronto.
Mi sono divertita parecchio a realizzare questa sfida.
Ho anche realizzato un video youtube così potrete vedere come ho fatto, vi lascio qui il link.
Questo articolo è finito, spero che vi sia piaciuto.
Today I want to show you the results of a challenge that I asked myself.
Last time I made a very long 10 cm nail, I leave you the video link here.
This time I focused on time.
I chose to reconstruct three nails with the nail form, with different time: one in an hour, one in 30 minutes and one in 10 minutes .. yes you read that right, read on to find out how it ended.
Let’s start!
1 hour
During the making of this nail I took all the time I needed to do a precise job.
I carried out the preparation of the nail using 3 efile bits, to remove the cuticles and opacify the surface of the nails, I used a delicate file to shape and further opacify the foil.
I applied all three preps and measured the nail form with extreme care, so as to put it as correctly as possible.
I applied a base using a thin brush and respected the polymerization times.
I extended the nail with the gel.
I then removed the nail form and created the structure.
I chose to file with the file because I had so much time and I wanted to have maximum control over what I was doing.
Once I finished filing I switched to color.
I applied two pink hands with extreme care, reaching the cuticle with a very thin brush, without ever touching the skin.
Once catalyzed I degreased the color and gently passed the buffer to opacify the surface.
So I made a French with red, I was very careful to make it precise.
I catalyzed and created a flower and a twirl, going later in the lamp.
My hour was about to end, so I applied a pearl to the center of the flower and sealed it with a dispersion top coat.
Once degreased I applied the cuticle oil and here is the nail made in 1 hour.
Do you like it? I am quite satisfied with the result.
30 minutes
To make this nail I had enough time but not too much to get lost in the details.
The procedure I have done is the same as before but a little faster and eliminating some things.
I skipped the nail opacification with the file, I filed the structure with the e-file to be a little faster.
I applied the color without using the fine brush.
I made the French, but I wasn’t as precise as the first and without catalyzing I already made the flower and the twirl.
I then applied half a pearl and a polish without dispersion to be faster.
I applied the top coat and that’s it.
So how is it?
In general it’s fine but I could have filed more on the sides to deflate the structure and on the central part the French is a bit shaky.
Now there will be fun.
10 minutes
Are you aware of all the rules that must be followed to correctly reconstruct a nail? Well forget them all. 😂
I ran against time.
I opacified the nail with the file quickly, and measured the nail form.
So I applied the nail prep and the binder which is a little faster to dry.
I put the nail form and applied the monophasic as a base, without catalyzing I perform the extension and also the structure, then I send in a lamp.
Obviously the product was quite a lot and therefore it went a little where it wanted.
I quickly filed with the e-file and switched to color.
I didn’t apply pink and directly with the color brush I drew French. Without catalyzing I made the flower and the twirl.
I catalyze only for 30 seconds and put the top coat without dispersion and I put the half pearl on it.
I catalyze for only 30 seconds and apply the oil.
I finished just in time and here is the final result.
This photo speaks for itself.
Although I had just made it, the nail already had lifting, the French is disproportionate, badly catalyzed and even the flower is not well done.
So is it possible to make a nail reconstruction in 10 minutes?