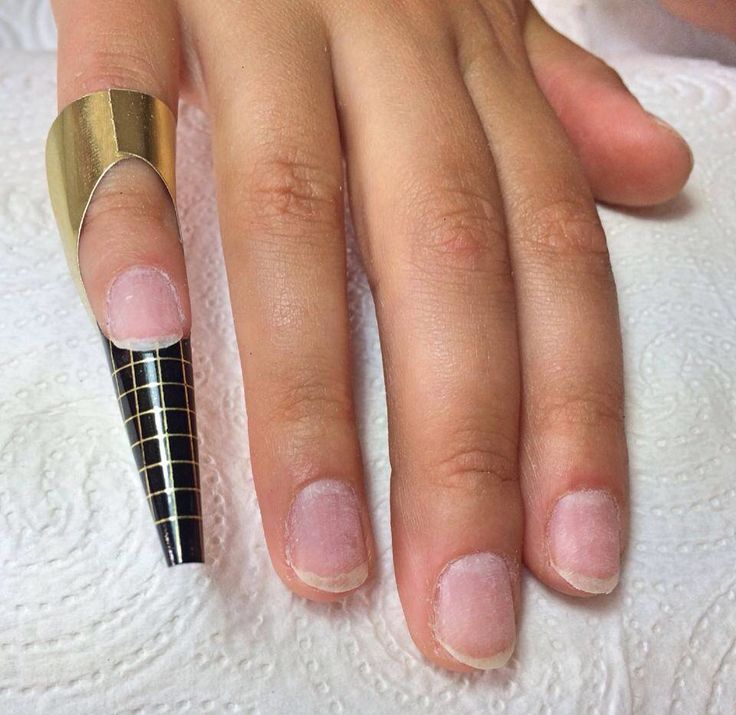
Per la forma quadrata la cartina va posta dritta rispetto l’unghia. Vista frontalmente dovrà essere aperta, quindi avere un tondino. Davanti avrà i laterali dritti.
Pipe
La pipe avrà le stesse caratteristiche della quadrata solamente che, siccome è una forma tecnica, presenterà il balance point, quindi la cartina sarà inclinata leggermente verso l’alto.
Marilyn
La marilyn presenta la cartina chiusa quasi tutta in punta, ma non completamente.
Di lato risulterà dritta e dal davanti avremmo come un triangolo ma non del tutto appuntito.
Mandorla gotica
Anche questa è una forma tecnica, quindi presenterà il balance point e la cartina di conseguenza sarà leggermente inclinata verso l’alto.
La chiuderemo tutta in punta e da sopra vedremo un triangolo completamente chiuso.
Stiletto, Ovale, Mandorla
Queste tre forme presentano la cartina allo stesso modo.
Sarà rivolta leggermente verso il basso, in modo da avere i laterali dritti, senza limarli troppo per assottigliare la punta, ed è completamente chiusa in punta.
Queste sono le forme principali. Voglio specificare che ci sono vari metodi per eseguire queste forme, quindi non è detto che tutti facciano come vi sto mostrando io, ognuno col tempo troverà anche la sua tecnica preferita.
Inoltre se ci si presentano unghie naturali da correggere, non è obbligatorio seguire le regole di inclinazione della cartina.
L’articolo finisce qui, spero vi sia stato utile.
Se questo articolo vi è piaciuto lasciate un like e condividete.
For the square shape the nail form should be placed straight respect to the nail. Seen from the front, it must be open. It will have straight sides in front.
Pipe
The pipe will have the same characteristics as the square only which, as it is a technical form, will present the balance point, therefore the nail form will be slightly tilted upwards.
Marilyn
Marilyn presents the nail form closed almost entirely at the tip, but not completely.
From the side it will be straight and from the front we would have a triangle but not completely pointed.
Gothic almond
This is also a technical form, so it will present the balance point and the nail form will consequently be slightly tilted upwards.
We will close it all at the tip and from above we will see a completely closed triangle.
Stiletto, Oval, Almond
These three shapes present the nail form in the same way.
It will be slightly tilted downwards, so as to have the sides straight, without filing them too much to thin the tip, and it is completely closed at the tip.
These are the main forms. I want to specify that there are various methods to perform these forms, so it is not said that everyone does as I am showing you, over time you will also find your favorite technique.
Furthermore, if you have natural nails to be corrected, you don’t have to follow the rules of inclination of the nail form.
The article ends here, I hope it was useful.
If you liked this article, leave a like and share.
Oggi voglio parlarvi dei vari metodi che esistono per ricostruire le unghie e le differenze tra essi.
Iniziamo!
Cartina
Questo metodo è il più utilizzato perché si può ottenere sia un risultato molto naturale, ma anche estremo, ricostruendo le forme estreme.
Con la cartina si ottiene tramite il giusto posizionamento della cartina e tramite la pinzatura, un ottima curva a c.
Questa ricostruzione richiede un po’ di tempo per l’adattamento delle cartine alle 10 unghie, ma comunque i risultati ottenuti sono molto belli.
Tip
Questa ricostruzione è un po’ più veloce di quella con le cartine perché una volta trovata la corretta tip che si adatta all’unghia basta incollarla e si può procedere creando la struttura
Il rischio è quello di sbagliare la misura della tip.
Se si sceglie troppo piccola non comprenderà i laterali, se invece è troppo grande risulta sproporzionata sull’unghia.
Comunque con le tip, che sono di un materiale plastico, non ai può pinzare, si rischia di creare una piega o danneggiare la tip, quindi il risultato sarà un po’ meno naturale
Inoltre forme come mandorla, rotonda, ovale si possono ottenere da una tip quadrata però i laterali verranno eliminati compromettendo la struttura dell’unghia
Volendo si possono comprare le tip già con la forma.
Si usa una sorta di tip inversa dove si applica il polygel.
Dopo di che si mette questa tip sull’unghia e in teoria si ha la struttura già pronta Basterebbe rifinire la forma e stendere il colore.
Il problema è trovare delle dual form di qualità.
Ce ne sono alcune troppo curvate verso il basso, altre troppo dritte e quindi la struttura risulterà sbilanciata.
E anche qui è importante scegliere la giusta misura, sennò l’unghia risulterà troppo artificiale.
Comunque nel caso in cui si abbiano ottime dual form e ottimo acrygel questo procedimento è molto più rapido rispetto agli altri.
Tip intera
Questo procedimento è abbastanza simile a quello di prima.
Bisogna trovare delle tip di qualità, possibilmente con una bella curva a c, e solubili nel remover,in modo da dover evitare di limare fino all’unghia naturale.
Si opacizza l’interno della tip, ai applica del gel costruttore e si preme dall’alto al basso la tip sull’unghia, in modo da far scorrere tutto il prodotto sulla lamina. Stringendolo si va a catalizzare in lampada.
Anche questo metodo è molto veloce perché non c’è bisogno di creare la struttura.
Però bisogna trovare delle tip adatte, che abbiano una curvatura tale che si crei autonomamente una bombatura.
Today I want to talk to you about the various methods that exist to reconstruct the nails and the differences between them.
Let’s start!
Nail form
This method is the most used because it is possible to obtain both a very natural result, but also an extreme one, by reconstructing the extreme forms.
With the nail form you get, through the correct positioning of it and through the pinching, an excellent c-curve.
This reconstruction takes some time to adapt the nail forms to the 10 nails, but in any case the results obtained are very beautiful.
Tip
This reconstruction is a little faster than the one with the nail form because once you have found the correct tip that fits the nail just glue it and you can proceed creating the structure
The risk is to miss the tip size.
If you choose too small it will not include the sidewalls, if it is too large it is disproportionate on the nail.
However with the tips, which are of a plastic material, it cannot pinch it, you risk creating a crease or damaging the tip, so the result will be a little less natural.
In addition, shapes such as almond, round, oval can be obtained from a square tip, however the sides will be eliminated by compromising the structure of the nail
If you want you can buy the tips already with the form.
A sort of inverse tip is used where polygel is applied.
After which you put this tip on the nail and in theory you have the structure ready. It would be enough to refine the shape and apply the color.
The problem is finding quality dual forms.
There are some too curved downwards, others too straight and therefore the structure will be unbalanced.
And here too it is important to choose the right size, otherwise the nail will be too artificial.
However, if you have excellent dual forms and excellent acrygel, this procedure is much faster than the others.
Full tip
This process is quite similar to the previous one.
You need to find quality tips, possibly with a nice c-curve, and soluble in the remover, so you have to avoid filing up to your natural nail.
You have to opaque the inside of the tip, the builder gel is applied and the tip is pressed from top to bottom, so that all the product flows on the nail plate. You cure it, holding the tip in place.
This method is also very fast because there is no need to create the structure.
But you need to find suitable tips that have such a curvature that you can create a camber yourself.
Fiberglass
Glass fibers are thin but very resistant material.
They are applied on the free edge of the nail and covered with the builder gel
Care must be taken to position them well on the sides, otherwise the structure will be compromised.
These also allow for excellent pinching and c-curves.
Once the extension is created, the structure is created.
These fibers can be used for minor repairs, such as silk sheets that are used in the same way.