Bentornati sul mio blog!
Oggi voglio parlarvi dei vari metodi che esistono per ricostruire le unghie e le differenze tra essi.
Iniziamo!
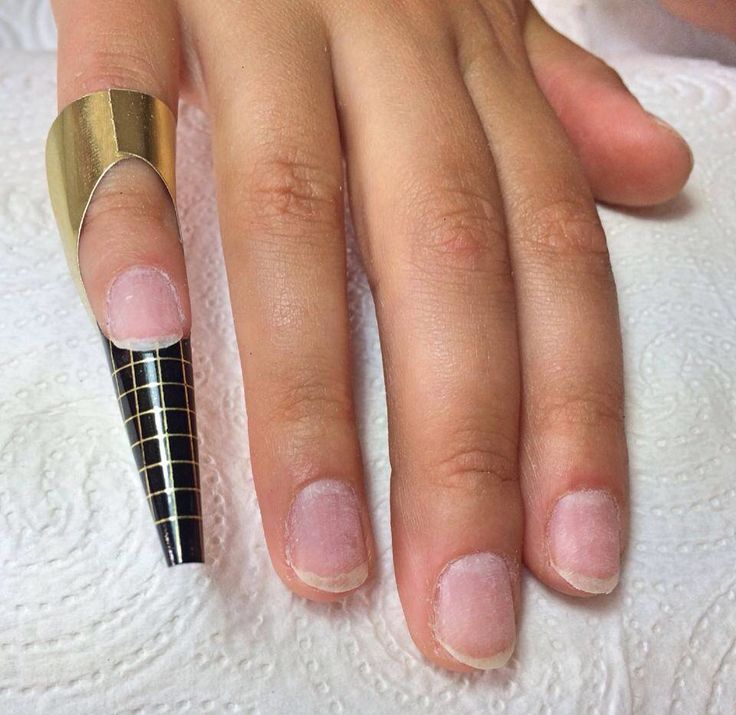
Cartina
Questo metodo è il più utilizzato perché si può ottenere sia un risultato molto naturale, ma anche estremo, ricostruendo le forme estreme.
Con la cartina si ottiene tramite il giusto posizionamento della cartina e tramite la pinzatura, un ottima curva a c.
Questa ricostruzione richiede un po’ di tempo per l’adattamento delle cartine alle 10 unghie, ma comunque i risultati ottenuti sono molto belli.
Tip
Questa ricostruzione è un po’ più veloce di quella con le cartine perché una volta trovata la corretta tip che si adatta all’unghia basta incollarla e si può procedere creando la struttura
Il rischio è quello di sbagliare la misura della tip.
Se si sceglie troppo piccola non comprenderà i laterali, se invece è troppo grande risulta sproporzionata sull’unghia.
Comunque con le tip, che sono di un materiale plastico, non ai può pinzare, si rischia di creare una piega o danneggiare la tip, quindi il risultato sarà un po’ meno naturale
Inoltre forme come mandorla, rotonda, ovale si possono ottenere da una tip quadrata però i laterali verranno eliminati compromettendo la struttura dell’unghia
Volendo si possono comprare le tip già con la forma.

Questa tecnica è piuttosto recente.
Si usa una sorta di tip inversa dove si applica il polygel.
Dopo di che si mette questa tip sull’unghia e in teoria si ha la struttura già pronta Basterebbe rifinire la forma e stendere il colore.
Il problema è trovare delle dual form di qualità.
Ce ne sono alcune troppo curvate verso il basso, altre troppo dritte e quindi la struttura risulterà sbilanciata.
E anche qui è importante scegliere la giusta misura, sennò l’unghia risulterà troppo artificiale.
Comunque nel caso in cui si abbiano ottime dual form e ottimo acrygel questo procedimento è molto più rapido rispetto agli altri.

Tip intera
Questo procedimento è abbastanza simile a quello di prima.
Bisogna trovare delle tip di qualità, possibilmente con una bella curva a c, e solubili nel remover,in modo da dover evitare di limare fino all’unghia naturale.
Si opacizza l’interno della tip, ai applica del gel costruttore e si preme dall’alto al basso la tip sull’unghia, in modo da far scorrere tutto il prodotto sulla lamina. Stringendolo si va a catalizzare in lampada.
Anche questo metodo è molto veloce perché non c’è bisogno di creare la struttura.
Però bisogna trovare delle tip adatte, che abbiano una curvatura tale che si crei autonomamente una bombatura.
Vi lascio il link di un video dove le uso.

Fibre di vetro
Le fibre di vetro sono del materiale sottile ma molto resistente.
Si applicano sul margine libero dell’unghia e le si ricoprono con il gel costruttore
Bisogna prestare bene attenzione a posizionarle bene sui laterali sennò si compromette la struttura.
Anche queste permettono un’ottima pinzatura e curva a c.
Una volta creato l’allungamento si crea la struttura.
Queste fibre possono essere usate per eseguire piccole riparazioni, come i fogli di seta che si usano con lo stesso procedimento.

Questa è una polvere acrilica, spesso usata per le coperture ma ho visto anche ricostruzioni con questo metodo.
Si applica una tip, invece del gel o acrilico si usa questa polvere e una colla speciale tra ogni strato.
Infine un attivatore che indurisce la polvere e ti permette di limarla.
Questo metodo secondo me è più macchinoso e richiede un po’ più di tempo,, inoltre la struttura creata non è delle ottimali.
Senza cartina
Questo metodo si utilizza soprattutto su chi ha le unghie cortissime, tipo le onicofagiche.
Con un prodotto piuttosto rigido come Acrygel o acrilico, si ricrea un minimo di lunghezza, giusto fino al polpastrello.
Quando poi l’unghia sarà abbastanza lunga allora si potrà scegliere uno dei metodi a mostra scelta.
Questi sono i principali metodi di ricostruzione che esistono.
Voi quale preferite?
Se questo articolo Vi è piaciuto lasciate like e condividete.
Non dimenticatevi di seguirmi su Instagram e sul mio canale youtube.
Alla prossima!
SOFIA


