I wanted to show you how I create the galaxy effect on the nails, but not with the polishes, but with gel colors.
Let’s start!
Base
As a base I use dark colors, such as blue and black, and blend them with a brush with a few bristles.
After which I seal and mattify the nails in order to create the decoration.
White
With a piece of sponge and white, I make a continuous line between the nails, tapping the color.
It is not necessary to be precise, in some areas I can apply more product, in others less.
Colors
With the same procedure I apply on the nuance that I have created of the colors that remind a little of a galaxy, therefore: yellow, green, purple etc.
However you can choose the colors you prefer.
Stars
After which I choose some points and make stylized stars, or dots as I like.
Glitter
To give an extra touch of light, always use a sponge to wipe a gel polish gold and silver glitter.
And here’s the way to easily make a galaxy on our nails.
Oggi vedremo assieme come realizzare facilmente delle unghie applicabili, le cosiddette unghie “press on”, letteralmente ‘unghie che si premono’, con design facilmente riproducibili.
Iniziamo!
Occorrente
Avremo bisogno di tip intere da applicare sulle unghie.
Potete scegliere se comprarle bianche, trasparenti oppure lattiginose.
Dopodiché avrete bisogno di piccoli quadratini adesivi, che serviranno all’applicazione.
Per decorare le unghie potete scegliere sia lo smalto, sia i semipermanenti che i gel color, io vi farò vedere tutte le alternative.
Base
Siccome voglio realizzare una nail art fresca e estiva, uso colori molto accesi.
Quindi su pollice e mignolo stendo un bel fucsia acceso, e sulle altre tre un colore nude.
Ne faccio due passate.
Fiori
Su indice e anulare realizzo sul lato destro 3 petali che creano il fiore.
Sul medio con lo stesso colore in basso realizzo dei puntini sparsi.
Con il bianco realizzo delle sfumature all’interno del fiore.
Proseguo sul medio a fare i puntini.
Foglie
Con il verde realizzo due foglie su ogni fiore e continuo i puntini sul medio.
Farfalla
Sul medio al di sopra di tutti i puntini realizzo una farfalla col corpo rosa e le ali verdi
Dettagli
Una volta realizzato tutto ciò rifiniamo con gli ultimi dettagli.
Sulle unghie con i fiori realizzo dei puntini che danno un tocco delicato, mentre dove si uniscono i petali utilizzo un oro glitterato per fare il centro del fiore.
Sulla farfalla con bianco faccio dei dettagli sulle ali.
Ed ecco qua le unghie realizzate con lo smalto!
Non preoccupatevi, vi mostro come le ho realizzate anche con il gel e il semipermanente.
Semipermanente
Gel
Ecco qua i risultati, vi piacciono? I colori non sono proprio gli stessi ma molto simili e stanno comunque bene tra loro.
Applicazione
La bellezza di queste unghie è che potete realizzarle se non volete ricostruire le vostre oppure vi viene difficile lavorare sulle vostre mani.
Vi potrete sbizzarrire senza aver paura di rovinare le vostre unghie se siete poco pratiche, oppure fare un risultato poco bello.
Prima di realizzare il design che avete scelto misurate le unghie e guardate se si adattano bene al vostro girocuticole, nel caso limatele.
Una volta realizzata la nail art, nel caso dello smalto lasciatela asciugare per qualche ora, dopodiché sarete pronti per applicare gli adesivi e quindi incollare sulle vostre unghie!
Potrete realizzare varie unghie per ogni occasione che vorrete!
L’articolo di oggi finisce qui.
Vi piacciono queste idee?
Se questo articolo vi è piaciuto lasciate un like e condividete.
Today we will see together how to easily make press on with easily reproducible designs.
Let’s begin!
Necessary
We will need whole tips to apply on nails.
You can choose to buy them white, transparent or milky.
After that you will need small adhesive squares, which will be used for the application.
To decorate your nails you can choose both nail polish, gel polish and color gels, I will show you all the alternatives.
Base
Since I want to make a fresh and summery nail art, I use very bright colors.
So on thumb and little finger I spread a nice bright fuchsia, and on the other three a nude color.
I make two coats.
Flowers
On the index and ring finger I create 3 petals on the right side that create the flower.
On the middle finger with the same color on the bottom I make dots.
With white I create shades within the flower.
And I continue on the medium to make the dots.
Leaves
With green I make two leaves on each flower and continue the dots on the middle finger.
Butterfly
On the middle above all the dots I make a butterfly with a pink body and green wings
Details
Once all this is done, we finish with the last details.
On the nails with the flowers I make dots that give a delicate touch, while where the petals join I use a glittery gold to make the center of the flower.
On the butterfly with white I make details on the wings.
And here are the nails made with the nail polish!
Don’t worry, I’ll show you how I also made them with gel polish and gel colors.
Gel polish
Gel color
Here are the results, do you like them? The colors are not quite the same but very similar and are still good with each other.
Application
The beauty of these nails is that you can make them if you don’t want to reconstruct yours or it is difficult for you to work on your hands.
Before realizing the design you have chosen, measure your nails and see if they fit well with your cuticles, you can file them, if necessary.
Once the nail art is done, in the case of the nail polish let it dry for a few hours, after which you will be ready to apply the stickers and then apply them on your nails!
You can make various nails for any occasion you want!
Today’s article ends here.
Do you like these ideas?
If you liked this article, leave a like and share.
Oggi voglio parlarvi dei vari metodi che esistono per ricostruire le unghie e le differenze tra essi.
Iniziamo!
Cartina
Questo metodo è il più utilizzato perché si può ottenere sia un risultato molto naturale, ma anche estremo, ricostruendo le forme estreme.
Con la cartina si ottiene tramite il giusto posizionamento della cartina e tramite la pinzatura, un ottima curva a c.
Questa ricostruzione richiede un po’ di tempo per l’adattamento delle cartine alle 10 unghie, ma comunque i risultati ottenuti sono molto belli.
Tip
Questa ricostruzione è un po’ più veloce di quella con le cartine perché una volta trovata la corretta tip che si adatta all’unghia basta incollarla e si può procedere creando la struttura
Il rischio è quello di sbagliare la misura della tip.
Se si sceglie troppo piccola non comprenderà i laterali, se invece è troppo grande risulta sproporzionata sull’unghia.
Comunque con le tip, che sono di un materiale plastico, non ai può pinzare, si rischia di creare una piega o danneggiare la tip, quindi il risultato sarà un po’ meno naturale
Inoltre forme come mandorla, rotonda, ovale si possono ottenere da una tip quadrata però i laterali verranno eliminati compromettendo la struttura dell’unghia
Volendo si possono comprare le tip già con la forma.
Si usa una sorta di tip inversa dove si applica il polygel.
Dopo di che si mette questa tip sull’unghia e in teoria si ha la struttura già pronta Basterebbe rifinire la forma e stendere il colore.
Il problema è trovare delle dual form di qualità.
Ce ne sono alcune troppo curvate verso il basso, altre troppo dritte e quindi la struttura risulterà sbilanciata.
E anche qui è importante scegliere la giusta misura, sennò l’unghia risulterà troppo artificiale.
Comunque nel caso in cui si abbiano ottime dual form e ottimo acrygel questo procedimento è molto più rapido rispetto agli altri.
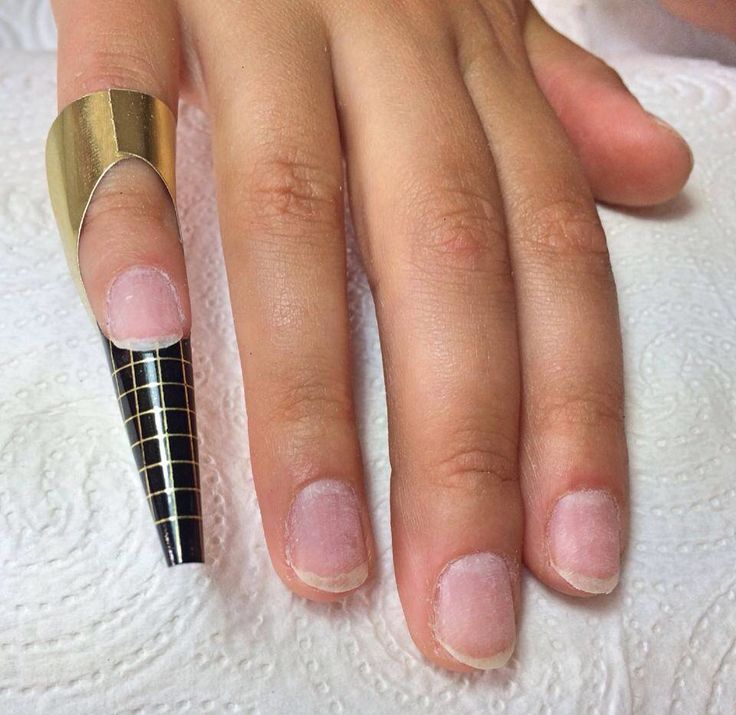
Tip intera
Questo procedimento è abbastanza simile a quello di prima.
Bisogna trovare delle tip di qualità, possibilmente con una bella curva a c, e solubili nel remover,in modo da dover evitare di limare fino all’unghia naturale.
Si opacizza l’interno della tip, ai applica del gel costruttore e si preme dall’alto al basso la tip sull’unghia, in modo da far scorrere tutto il prodotto sulla lamina. Stringendolo si va a catalizzare in lampada.
Anche questo metodo è molto veloce perché non c’è bisogno di creare la struttura.
Però bisogna trovare delle tip adatte, che abbiano una curvatura tale che si crei autonomamente una bombatura.
Today I want to talk to you about the various methods that exist to reconstruct the nails and the differences between them.
Let’s start!
Nail form
This method is the most used because it is possible to obtain both a very natural result, but also an extreme one, by reconstructing the extreme forms.
With the nail form you get, through the correct positioning of it and through the pinching, an excellent c-curve.
This reconstruction takes some time to adapt the nail forms to the 10 nails, but in any case the results obtained are very beautiful.
Tip
This reconstruction is a little faster than the one with the nail form because once you have found the correct tip that fits the nail just glue it and you can proceed creating the structure
The risk is to miss the tip size.
If you choose too small it will not include the sidewalls, if it is too large it is disproportionate on the nail.
However with the tips, which are of a plastic material, it cannot pinch it, you risk creating a crease or damaging the tip, so the result will be a little less natural.
In addition, shapes such as almond, round, oval can be obtained from a square tip, however the sides will be eliminated by compromising the structure of the nail
If you want you can buy the tips already with the form.
A sort of inverse tip is used where polygel is applied.
After which you put this tip on the nail and in theory you have the structure ready. It would be enough to refine the shape and apply the color.
The problem is finding quality dual forms.
There are some too curved downwards, others too straight and therefore the structure will be unbalanced.
And here too it is important to choose the right size, otherwise the nail will be too artificial.
However, if you have excellent dual forms and excellent acrygel, this procedure is much faster than the others.
Full tip
This process is quite similar to the previous one.
You need to find quality tips, possibly with a nice c-curve, and soluble in the remover, so you have to avoid filing up to your natural nail.
You have to opaque the inside of the tip, the builder gel is applied and the tip is pressed from top to bottom, so that all the product flows on the nail plate. You cure it, holding the tip in place.
This method is also very fast because there is no need to create the structure.
But you need to find suitable tips that have such a curvature that you can create a camber yourself.
Fiberglass
Glass fibers are thin but very resistant material.
They are applied on the free edge of the nail and covered with the builder gel
Care must be taken to position them well on the sides, otherwise the structure will be compromised.
These also allow for excellent pinching and c-curves.
Once the extension is created, the structure is created.
These fibers can be used for minor repairs, such as silk sheets that are used in the same way.
Oggi parliamo di questa nuova tecnica che da un po’ di tempo si sta facendo largo.
Iniziamo!
Cos’è
Questa tecnica offre sulle unghie un aspetto naturale, come se si indossasse il semipermanente, ma anche più resistente, come se fosse una copertura in gel.
Inoltre lo si può rimuovere sciogliendolo e non richiede la limatura della struttura.
Questo trattamento è consigliato su chi vuole indossare il semipermanente ma ha unghie fragili.
Sappiamo che il semipermanente su unghie problematiche non ha un’ottima adesione, quindi si può optare per questa nuova procedura.
Cosa serve
Per realizzarlo occorre acquistare delle basi specifiche.
Oramai quasi tutti i brand le hanno, e queste sono basi più spesse e corpose, che ti permettono facilmente di creare un piccolo rinforzo sull’unghia.
Alcune marche creano questi prodotti anche per creare piccoli allungamenti, di massimo 3 millimetri.
Procedimento
Dopo aver preparato l’unghia con i preparatori indicati dall’azienda, si crea prima uno strato sottile di base, in modo da poter far scivolare il prodotto che applicheremo dopo.
Senza catalizzare si applica una quantità maggiore di semipermanente, per creare quella che potrebbe essere una piccola bombatura, in modo da garantire massima resistenza.
In genere questi prodotti sono molto autolivellanti e creano da soli la struttura.
Quindi una volta catalizzato non ci dovrebbe essere bisogno di limare, è comunque consigliato applicare un buffer in modo da permettere una migliore adesione del colore.
Alla fine è un ottima alternativa alle coperture in gel che hanno un procedimento un po’ più lungo.
L’articolo di oggi finisce qui, spero vi sia stato utile.
Se volete vedere come lavorare questo prodotto, potete guardare il mio ultimo video sul mio canale youtube, vi lascio qua il link.
Se questo articolo vi è piaciuto lasciate un like e condividete.
Today we are talking about this new technique which has been making its way for some time.
Let’s begin!
What’s this
This technique offers a natural look on the nails, as if you were wearing the gel polish, but also more resistant, as if it were a gel coating.
In addition, it can be removed by dissolving it and does not require filing of the structure.
This treatment is recommended for those who want to wear gel polish but have brittle nails.
We know that gel polish on problematic nails does not have excellent adhesion, so you can opt for this new procedure.
What is needed
To achieve this, specific bases must be purchased.
By now almost all brands have them, and these are thicker and fuller bases, which allow you to easily create a small reinforcement on the nail.
Some brands also create these products to create small stretches, of maximum 3 millimeters.
Pocedure
After preparing the nail with the preparers indicated by the company, a thin base layer is created first, so that the product that we will apply later can slide.
Without catalyzing, a greater quantity of gel polish is applied, to create what could be a small apex, in order to guarantee maximum resistance.
In general, these products are very self-leveling and create the structure themselves.
So once catalyzed there should be no need to file, it is still recommended buffer in order to allow a better adhesion of the color.
In the end it is an excellent alternative to gel covers that have a slightly longer process.
Today’s article ends here, I hope it was useful.
If you want to see how to work this product, you can watch my latest video on my youtube channel, I leave you the link here.
If you liked this article, leave a like and share.
Oggi voglio parlare di un’argomento molto importante, la salute delle onicotecniche.
Questo lavoro ci porta a stare ore e ore sedute, spesso concentrate su un lavoro, tanto che non ci accorgiamo di alcune cattive posture o abitudini abbiamo.
Vedremo cosa è meglio e cosa non è meglio fare, per preservare la nostra salute, e soprattutto ad esempio, la sindrome del tunnel carpale.
Iniziamo!
1.
Dal momento che alcuni problemi possono incorrere dalla torsione scorretta, mantenete gli oggetti ben di fronte a voi, evitate di tendere ad un lato. Inoltre evitate di torcere anche il collo, come se stesse tenendo il telefono con una spalla. La testa dovrebbe essere tenuta dritta e le spalle rilassate.
2.
Evitate di allungarvi, per più di 30 cm, e mantenete gli avambracci paralleli al pavimento. Questa è detta “posizione neutrale”.
3.
Scegliete delle sedie di qualità, preferibilmente quelle rotanti, che abbiano la seduta un po’ più larga delle vostre cosce, e aggiustate la sua altezza, in modo che le cosce siano parallele al pavimento con tutta la superficie dei piedi che tocca per terra.
4.
Non incrociate le gambe e utilizzate tutta la seduta della sedia, senza sedersi lateralmente. Assicuratevi inoltre che essa sia ben imbottita, in modo da non creare pressione sulla parte posteriore delle gambe o ginocchia.
5.
Minimizzate altri punti di pressione, quindi non tenete le braccia sullo spigolo del tavolo. Potete usare della spugna o imbottiture sul bordo del tavolo, in modo da evitare tutto ciò.
6.
Evitate di pendere in avanti o indietro. La testa, il collo e il corpo dovrebbe essere ben dritto, senza torcersi o incurvarsi.
7.
Invece di torcere il vostro corpo, per lavorare, gentilmente posizionate la mano o il piede della cliente in modo che voi siate più confortevoli possibili. Durante le pedicure è importante usare sedie reclinabili che aiutano e supportano bene le gambe della cliente.
8.
Usa un cuscino, da appoggiare sulla zona lombare, in modo da allentare la pressione.
9.
Le mani e i polsi devono essere tenuti dritti, non piegati o storti lateralmente.
10.
Mentre tenete la mano o il dito della cliente, posizionatelo in modo che minimizzate la pressione della tenuta. Tenetela invece in modo delicato e rilassato, per ridurre lo sforzo.
Ecco qua, questi sono alcuni consigli che sicuramente vi faciliteranno il lavoro!
L’articolo di oggi finisce qui, se vi è piaciuto lasciate un like e condividetelo!
Today I want to talk about a very important topic, the health of nail technicians.
This job leads us to spend hours and hours sitting, often concentrated on a job, so much so that we don’t notice some bad postures or habits we have.
We will see what is better and what is not better to do, to preserve our health, and especially for example, carpal tunnel syndrome.
Let’s begin!
1.
Since some problems can occur from incorrect twisting, keep the objects well in front of you, avoid tending to one side. Also avoid twisting your neck, as if he were holding the phone with one shoulder. The head should be kept straight and the shoulders relaxed.
2.
Avoid stretching for more than 30 cm and keep your forearms parallel to the floor. This is called “neutral position”.
3.
Choose quality chairs, preferably the rotating ones, which have the seat a little wider than your thighs, and adjust its height, so that the thighs are parallel to the floor with the whole surface of the feet touching the ground.
4.
Do not cross your legs and use the whole seat of the chair, without sitting sideways. Also make sure that it is well padded, so as not to create pressure on the back of the legs or knees.
5.
Minimize other pressure points, so don’t keep your arms on the edge of the table. You can use sponge or padding on the edge of the table, in order to avoid this.
6.
Avoid leaning forward or backward. The head, neck and body should be straight, without twisting or bending.
7.
Instead of twisting your body, to work, kindly position the client’s hand or foot so that you are as comfortable as possible. During pedicures it is important to use reclining chairs that help and support the client’s legs well.
8.
Use a pillow, to be placed on the lower back, in order to release the pressure.
9.
Your hands and wrists should be kept straight, not bent or twisted sideways.
10.
While holding the client’s hand or finger, position it so that you minimize the pressure of the seal. Instead, keep it gently and relaxed to reduce strain.
Here you are, these are some tips that will surely make your job easier!
Today’s article ends here, if you liked it, leave a like and share it!
Oggi voglio proporvi una cosa divertente, ora vi spiego!
In questi giorni stavo pensando che spesso mi capita di parlare di unghie, prodotti e tecniche con persone, soprattutto uomini, che non se ne intendono, come per esempio il mio ragazzo o mio fratello.
A volte parlo di cose più difficili, altre di cose più facili, in tutto ciò non ho mai la certezza che sono ascoltata sul serio!🤣
Sono l’unica o anche voi condividete le vostre passioni con i vostri cari?
Allora mi è venuta in mente questa idea del quiz.
Sapranno rispondere a delle domande semplici (se veramente fino ad ora ci hanno ascoltato ahah) sul mondo delle unghie?
Quindi sul mio profilo instagram ho pubblicato delle storie interattive, dove potrete far rispondere alla persona in questione alle domande, e in base a quante risposte faranno corrette, otterranno un risultato!