Ideas to create Jewel nails

Welcome back to my blog!

Today I am here because I want to offer you ideas to make your nails real jewels.

Today we will add to the glitter, swaroski and beads.

Let’s begin!

Jewel nail on french

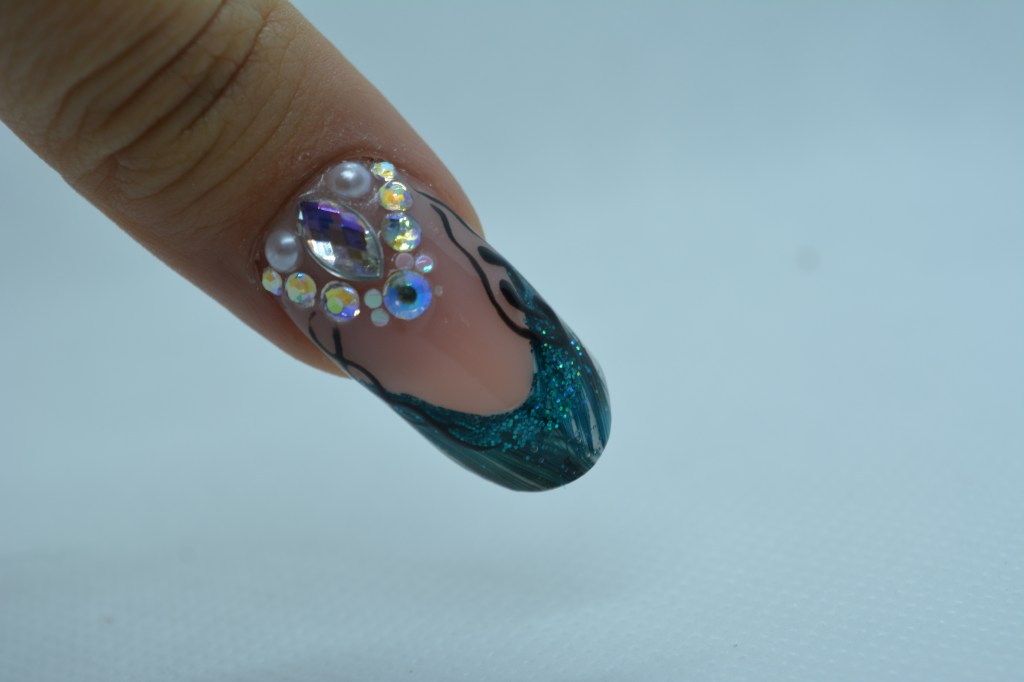
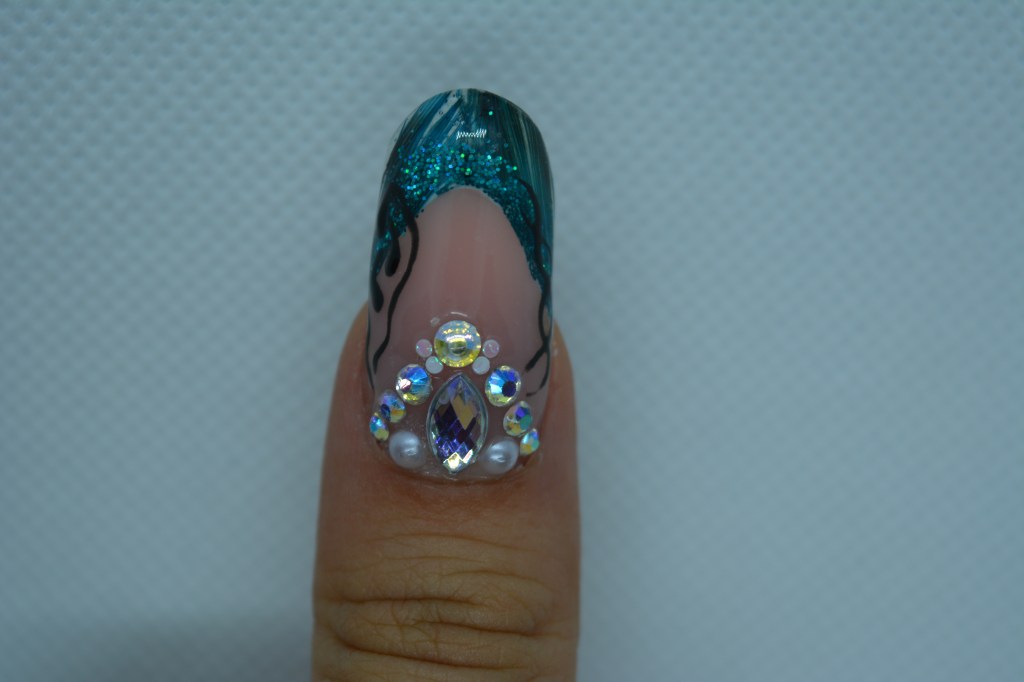
You will certainly remember this nail, I had inserted it in those where I showed how to create the under-glass effect.

To add some preciousness near the cuticle, I applied a large drop-shaped diamond to the center.

To frame and follow the figure of the rhinestones I have also decided to put glitter of increasing size.

To add instead a more delicate touch, I put pearls at the base of the diamond and finally two small iridescent dots.

Jewel nail on a single color base

To bring out the glitter to the maximum, I think it is appropriate to create a base that is as neutral as possible.

So after applying my chosen color, I decided to create my own composition.

The protagonist is the drop-shaped glitter.

As it is in relief, to fill the spaces that were created I added these violet stones and two other little diamonds, smaller and transparent.

To give a touch of color, I applied the gold bar and finally to make a somewhat elongated shape to the composition, I applied three decreasing glitter below it.

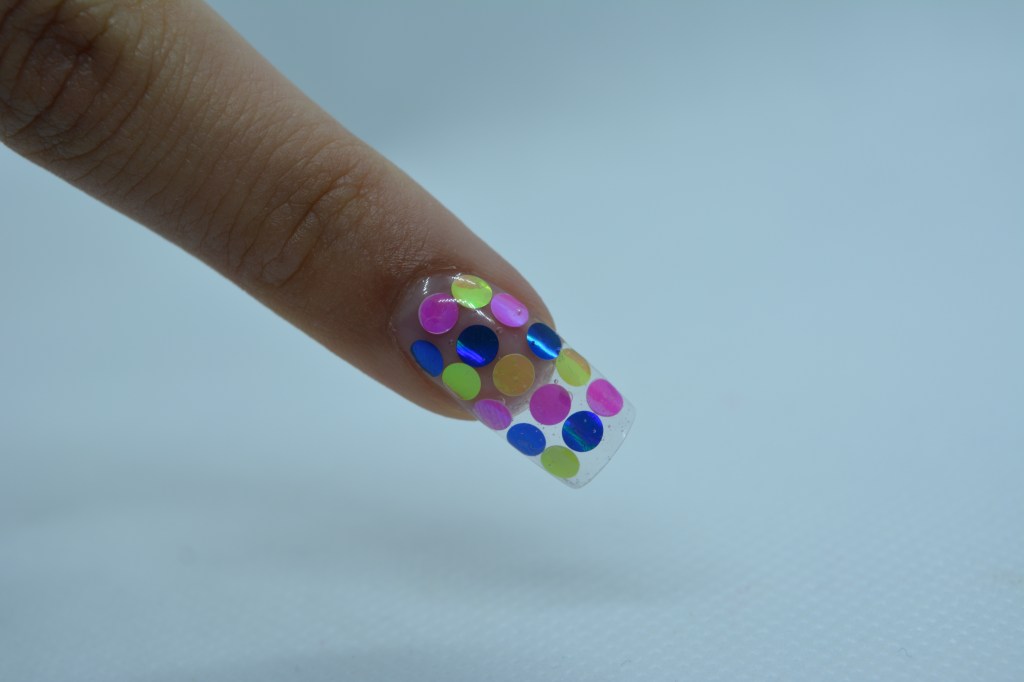
Jewel nail on a sugar effect base

If you want you can also choose to resume the brilliance of the glitter by creating a sugar effect on the nail.

In the idea I propose, I also applied a very large brilliant in the center.

Following its shape I surrounded it with pearls, which have fuchsia microspheres between them.

At the top I applied a boreal rhinestone, while at the bottom one that reflects the color of the base.

The latter was also surrounded by colored microspheres.

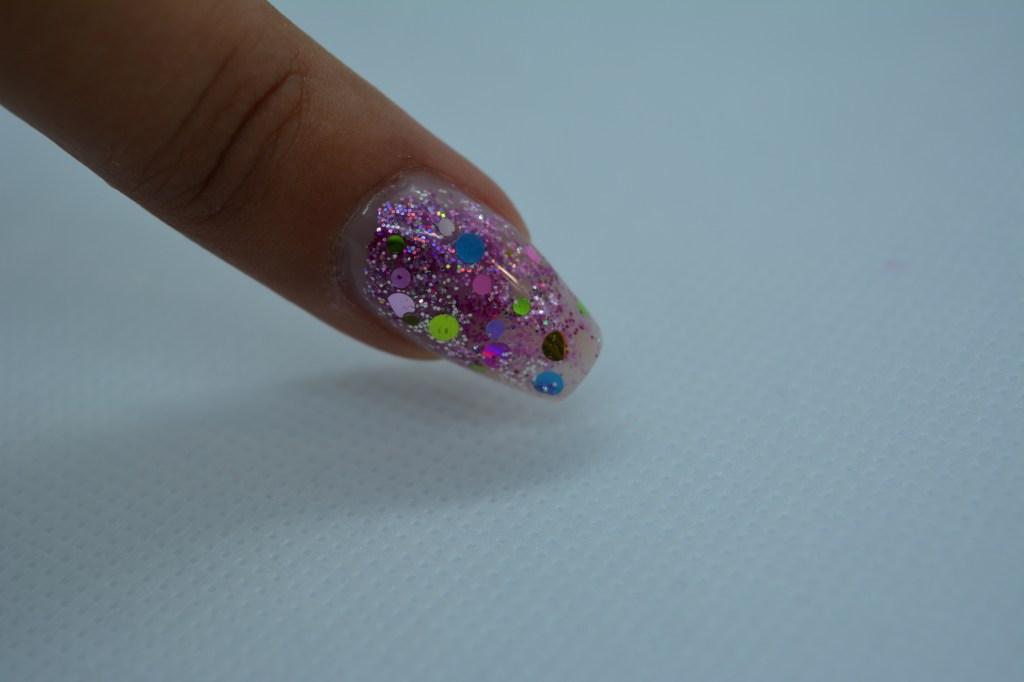
Jewel fingernail on a holographic basis

If the sugar effect was too intense, but a single color base would be too dull, there is a middle ground.

By creating a holographic effect on a white base, you can get the right brightness without being overdone.

So to maintain this delicacy, I applied a small rhinestone to the center and with even smaller ones I surrounded it, creating also two straight lines.

At the end of each line there are two blue microspheres.

Jewel nails on a fantasy base

There is also the possibility of embellishing a simple fantasy.

So above a zebra-striped nail, I chose to apply like a belt of glitter of a similar size, so as not to be too discordant with one another.

Here are some of my ideas for creating jewel nails, I hope you enjoyed them.

If you liked this article, leave a like and share.

Don’t forget to follow me on Instagram and on my Youtube channel!

See you soon!

SOFIA

Idee per creare unghie Gioiello

Bentornati sul mio blog!

Oggi sono qui perchè voglio proporvi delle idee per rendere le vostre unghie dei veri e propri gioielli.

Oggi abbonderemo con glitter, swaroski e perline.

Iniziamo!

Unghia gioiello su french

Quest’unghia la ricorderete di sicuro, la avevo inserita in quelle dove mostravo come poter creare l’effetto sottovetro.

Per aggiungere un po’ di preziosità vicino al giro cuticole, ho applicato al centro un grosso brillantino a forma di goccia.

Per incorniciare e seguire la figura dello strass ho deciso anche di mettere dei brillantini di grandezza crescente.

Per aggiungere invece un tocco più delicato ho messo delle perle alla base del brillantino e infine due piccoli pallini iridescenti.

Unghia gioiello su base monocolore

Per far risaltare al massimo i brillantini, penso sia opportuno creare una base che sia la più neutra possibile.

Dunque dopo aver applicato il mio colore a scelta, ho deciso di creare la mia composizione.

In protagonista è il brillantino a forma di goccia.

Siccome è in rilievo, per riempire gli spazi che si creavano ho aggiunto queste pietruzze viola e altri due diamantini, più piccoli e trasparenti.

Per dare un tocco di colore, ho applicato la barretta oro e infine per fare una forma un po’ allungata alla composizione, ho applicato tre brillantini decrescenti al di sotto di essa.

Unghia gioiello su base effetto zucchero

Volendo si può anche scegliere di riprendere la brillantezza dei glitter creando sull’unghia un effetto zucchero.

Nell’idea che propongo ho anche in questo caso applicato un brillante molto grande al centro.

Seguendo la sua forma l’ho contornato con delle perle, che tra di loro hanno delle microsfere fucsia.

In cima ho applicato uno strass boreale, in basso invece uno che riprende il colore della base.

Quest’ultimo è stato contornato anche lui con delle microsfere colorate.

Unghia gioiello su base olografica

Se l’effetto zucchero fosse troppo intenso, ma una base monocolore sarebbe troppo spenta, c’è una via di mezzo.

Creando un effetto olografico su di una base bianca, si potrà ottenere la giusta luminosità senza però essere esagerati.

Quindi per mantenere questa delicatezza, ho applicato al centro uno strass un po’ piccolo e con quelli ancora più piccoli l’ho contornato, creando anche due linee dritte.

Alla fine di ogni linea ci sono due microsfere blu.

Unghie gioiello su base a fantasia

C’è anche la possibilità di impreziosire una semplice fantasia.

Dunque al di sopra di un’unghia zebrata, ho scelto di applicare come una cintura di brillantini, di grandezza simile, per non essere troppo discordanti tra loro.

Ecco qui alcune mie idee per poter creare delle unghie gioiello, spero che vi siano piaciute.

Se questo articolo vi è piaciuto lasciate un like e condividete.

Non scordatevi di seguirmi su Instagram e sul mio canale Youtube!

Alla prossima!

SOFIA

I challenge the lasting of different Polish brands

Welcome back to everyone!

Today I will take a test on the durability of various polish brands with this article.

I kept these polish on my right hand for 12 days.

Together we will find out which one behaved better.

Let’s start!

11/17

Starting point and used polishes

These were my nails, just made the nail polish.

Now I will put the photos of the products, in order from the little finger to the thumb.

As you can see I have changed in the brands, so that it was a homogeneous test.

Furthermore, as bases, I chose to vary between glossy and opaque.

I also thought that the drops that help the drying process of polish could also have an effect, so I chose two brands.

In the past I worked better with opaque bases, so I thought the index and middle would be those with longer duration.

We’ll find out if I was right.

11/19

Polishes are known for the fact that they chip very easily.

In fact, as you can see, the thumb was the first to chip, although I had paid close attention to sealing the nail polish on the tip.

11/22

After two days, even the medium and index, which were the ones I hoped for the most, had two large chips.

The thumb was no longer sealed, so the polish slowly ruined more and more.

The little finger and the ring finger instead remained the same.

Most likely the first three fingers were ruined first because they are the ones I use most in everyday life.

I also thought that the thumb would have lasted longer, because in my experience polishes with glitter have more resistance than those without.

11/25

As the days go by, the first three fingers present less product, losing adhesion, almost leafing through it, especially the medium one.

The little finger still resists, it’s a bit ruined because I used glue without gloves.

The ring finger also looks perfect but it can be seen that it has a very small chip on the right corner.

11/28

On this day I decided that I would end the test, because 12 days had already passed, when a polish in general remains beautiful for 1 week.

This is the final situation.

The ring finger is almost perfect except for another chip on the left corner and you can see the first three fingers with your eyes.

The little finger is still perfect.

Final considerations

I have to admit that I am disappointed with Essence’s All in one Ridge filler base.

I thought it would be the one with the best performances, instead it turned out to be the worst.

I am amazed, on the other hand, by the glossy SOS power Repair base by Essence, which I used on the ring finger, which did not present major problems.

Surely its duration will have been influenced also by the glitter above.

The thumb had the behavior I expected.

The little finger gave me satisfaction instead.

I used a Layla polish that has a particular formulation. It’s called 3.0 Hybrid nail polish.

It says it lasts even 15 days.

Initially I was skeptical, I didn’t think it was true what he promised, but I changed my mind.

The little finger was the only finger that didn’t have chipping problems, and I think it’s also due to the base that didn’t lift.

I used a shiny base, Triple Care by Essence.

Obviously this is a test based on my nails. These products may have another hold on nails and a different lifestyle.

Furthermore some fingers of one hand are used more often than others, this also affects the duration of the enamel.

Ranking

Based on the combinations of polishes you saw at the beginning, I will create the ranking.

5th place – Middle

4th place – Index

3rd place – Thumb

2nd place – Ring road

and in first place of course .. the Little Finger!

I hope you enjoyed this article. What do you think about the lasting of these polishes?

Let me know if you still want to read articles like this.

If you liked it, leave like and share it!

Don’t forget to follow me on Instagram and on my channel YouTube!

See you soon!

SOFIA

Testo la durata di varie marche di smalto

Bentornati a tutti!

Oggi porterò con questo articolo un test sulla durata di varie marche di smalto.

Ho tenuto sulla mia mano destra questi smalti per 12 giorni.

Insieme scopriremo quale si è comportato meglio.

Iniziamo!

17/11

Situazione iniziale e smalti usati

Queste erano le mie unghie, appena fatto lo smalto.

Ora metterò le foto dei prodotti, in ordine dal mignolo al pollice.

Come potete notare ho variato nelle marche, in modo che fosse un test omogeneo.

Inoltre come basi ho scelto di variare tra lucide e opache.

Ho pensato che anche le gocce asciuga smalto potessero influire per cui ne ho scelte due marche.

In passato mi trovavo meglio con le basi opache, per cui pensavo che l’indice e il medio sarebbero stati quelli con durata maggiore.

Scopriremo se avevo ragione.

19/11

Gli smalti sono conosciuti per il fatto che si sbeccano molto facilmente.

Infatti come potete vedere il pollice è stato il primo a sbeccarsi, nonostante io avessi prestato molta attenzione a sigillare bene lo smalto in punta.

22/11

Dopo due giorni anche il medio e l’indice, che erano quelli su cui speravo di più, presentavano due grosse sbeccature.

Il pollice oramai non era più sigillato, dunque piano piano lo smalto si levava sempre di più.

Il mignolo e l’anulare invece sono rimasti identici.

Molto probabilmente le prime tre dita si sono rovinate prima perchè sono quelle che utilizzo maggiormente nel quotidiano.

Inoltre pensavo che il pollice avrebbe resistito di più, perchè nella mia esperienza gli smalti con i glitter hanno più resistenza di quelli senza.

25/11

Con il passare dei giorni, le prime tre dita presentano sempre meno prodotto, perdendo aderenza, quasi sfogliandosi, soprattutto il medio.

Il mignolo resiste ancora, è un po’ rovinato perchè ho usato della colla senza guanti.

L’anulare sembra anche perfetto ma si può notare che ha una piccolissima sbeccatura all’angolo destro.

28/11

In questo giorno ho deciso che avrei posto fine al test, perchè erano passati già 12 giorni, quando uno smalto in generale resta bello per 1 settimana.

Questa è la situazione finale.

L’anulare è quasi perfetto tranne un’altra sbeccatura all’angolo sinistro e le prime tre dita le potete vedere con i vostri occhi.

Il mignolo è ancora perfetto.

Considerazioni finali

Devo ammettere che sono delusa dalla base All in one Ridge filler di Essence.

Pensavo che sarebbe stata quella con le performance migliori, invece si è rivelata la peggiore.

Sono stupita invece dalla base lucida SOS power Repair della Essence, che ho utilizzato sull’anulare, che non ha presentato grandi problemi.

Sicuramente la sua durata sarà stata influenzata anche dai brillantini al di sopra.

Il pollice ha avuto il comportamento che mi aspettavo.

Il mignolo invece mi ha dato soddisfazione.

Ho usato uno smalto della Layla che ha una formulazione particolare. Si chiama 3.0 Hybrid nail polish.

Dice di durare perfetto anche 15 giorni.

Inizialmente ero scettica, non credevo che fosse vero ciò che prometteva, ma mi devo ricredere.

Il mignolo è stato l’unico dito che non ha avuto problemi di sbeccatura, e penso sia anche dovuto alla base che non si è sollevata.

Ho usato una base lucida, Triple Care di Essence.

Ovviamente questo è un test basato sulle mie unghie. Questi prodotti potrebbero avere un’altra tenuta su unghie e stile di vita diverso.

Inoltre alcune dita di una mano si usano più spesso si altre, anche questo influisce sulla durata dello smalto.

Classifica

In base alle combinazioni di smalti che avete visto all’inizio, stilerò una classifica.

5° posto– Medio

4°posto– Indice

3°posto– Pollice

2°posto– Anulare

e al primo posto ovviamente.. il Mignolo!

Spero che questo articolo vi sia piaciuto. Cosa ne pensate voi della durata di questi smalti?

Fatemi sapere se volete leggere ancora articoli di questo genere.

Se vi è piaciuto, lasciate like e condividetelo!

Non dimenticatevi di seguirmi su Instagram e sul mio canale YouTube!

Alla prossima!

SOFIA

I create a nail with most techniques I know

Welcome back to my blog!

Today I want to bring you a kind of challenge with myself!

I decided to create a nail with most of the nail art techniques I know!

Let’s begin!

French

I decided to create an almond shape with a deep and inverse french, using a constructor cover to optically lengthen the nail bed.

Marble

As a French color I decided to create a marble effect.

I placed the colors of my choice on a surface and mixed them but not completely. I wanted to get streaks.

Once I reached a pleasant result, with a fairly large brush I took the color and applied it on the french.

Under-glass

To create this effect, I encapsulated fake dried flowers and even glitter in the french to add an extra touch of color.

Plasticine

As a common element I decided to choose flowers so I made one with plasticine. if you want to know more read the article dedicated to it.

Sugar

In my nail art I have repeated it several times.

I made the leaves of the plasticine flower by applying a glittery powder over the green color, so that it remained in relief.

Microspheres

To make the other two leaves of the flower I instead used lilac microspheres.

Acrylic painting

To frame the french I also made two black roses with acrylic paint.

Chrome

Under the plasticine flower I made three dots with black which I then sprinkled with rose gold chrome powder.

Rhinestone

Finally, to add a touch of extra light I added some rhinestones near the cuticle, and one also in the center of the flower.

These are all the techniques I used to create this nail.

I know several others but it would have been a bit difficult to put them all.

If you are interested in other techniques anyway, consult the “Decorazioni” section of my blog!

I hope you enjoyed this article. I really enjoyed this challenge to myself.

If you liked this article, leave a like and share.

Don’t forget to follow me on Instagram and on my Youtube channel!

Until next time!

SOFIA

Creo un’unghia con la maggior parte di tecniche che conosco

Bentornati sul mio blog!

Oggi voglio portarvi una specie di sfida con me stessa!

Ho deciso di creare un’unghia con la maggior parte di tecniche riguardanti la nail art che conosco!

Iniziamo!

French

Ho deciso di creare una mandrola con una french inversa e profonda, utilizzando un cover costruttore per allungare otticamente il letto ungueale.

Marmo

Come colore della french ho deciso di realizzare un effetto marmo.

Ho appoggiato su una superficie i colori a mia scelta e li ho mescolati ma non completamente. Volevo ottenere delle striature.

Una volta raggiunto un risultato a me gradevole, con un pennello abbastanza grande ho prelevato il colore e applicato sulla french.

Sottovetro

Per creare questo effetto ho incapsulato nella lunetta dei fiori finti secchi e anche dei glitter, per dare un tocco di colore in più.

Plastilina

Come elemento comune ho deciso di scegliere i fiori quindi ne ho realizzato uno con la plastilina. se volete saperne di più leggete pure l’articolo ad essa dedicato.

Zucchero

Nelle mie nail art l’ho riproposto parecchie volte.

Le foglie del fiore in plastilina le ho realizzate applicando sopra al colore verde una polvere glitterata, in modo rimanesse in rilievo.

Microsfere

Per fare le altre due foglie del fiore ho invece usato delle microsfere lilla.

Pittura acrilica

Per incorniciare il french ho anche realizzato due rose nere con la pittura acrilica.

Cromato

Sotto al fiore di plastilina ho realizzato tre puntini con il nero che poi ho cosparso di polvere cromata oro rosa.

Brillantini

Infine per aggiungere un tocco di luce in più ho aggiunto degli strass vicino al giro cuticole, e uno anche al centro del fiore.

Queste sono tutte le tecniche che ho utilizzato per creare quest’unghia.

ne conosco parecchie altre ma sarebbe stato un po’ difficile inserirle tutte.

Se comunque vi interessa sapere altre tecniche, consultate la sezione Decorazioni del mio blog!

Spero questo articolo vi sia piaciuto. Io mi sono divertita molto in questa sfida a me stessa.

Se questo articolo vi è piaciuto lasciate un like e condividete.

Non scordatevi di seguirmi su Instagram e sul mio canale Youtube!

Alla prossima!

SOFIA

Which shape should I do?

Welcome back to my blog!

Today I want to talk to you about something that customers often ask themselves.

What shape can I choose for my hands?

Let’s start!

Oval

This form is suitable for those with a wide nail bed and a rather large hand.

This shape helps the hand to appear more tapered and is an excellent shape for those who want to wear short nails.

In fact this shape makes the hand softer, they are perfect for a natural look and are easy to make.

Almond

The almond is very similar to the oval.

This is suitable for those with slightly squat and short fingers, because the tapered and delicate tip will allow your fingers to slender.

The almond can be made both of medium-short length, but also quite long.

Stiletto

The stiletto nails, look like a very long and pointed almond.

Certainly one must be used to wearing long nails: the stiletto must have a minimum of 3 centimeters in length !!

They are therefore suitable for lovers of extravagant nails, but also for those with chubby hands, because their length will tend to make them loose.

Square / Marylin / Ballerina

These types of nails have the characteristic of having a straight tip.

They are not recommended for those who already have a small, squat hand because the straight tip will optically cut the length of the finger.

So they will go well on the already long and beautiful tapered hands.

Extreme shapes

The extreme forms like the Edge, the Cube, Russian Almond and Gothic Almond are beautiful, in my opinion only for exposure.

They are very long, difficult to carry and difficult to make.

If you want to have them for a day, then ok, but in everyday life they would be a bit difficult to manage.

I hope this brief but concise article may have helped you.

If you liked this article, don’t forget to leave a like and share.

Follow me on Instagram and Youtube !

See you soon!

SOFIA

Quale forma di unghia scegliere in base alla mia mano?

Bentornati sul mio blog!

Oggi voglio parlarvi di una cosa che spesso le clienti si domandano.

Quale forma posso scegliere per le mie mani?

Iniziamo!

Ovale

Questa forma è adatta a chi ha un letto ungueale largo e una mano piuttosto grande.

Questa forma aiuta la mano ad apparire più affusolata ed è una forma ottima per chi vuole portare le unghie corte.

Infatti questa forma rende più dolce la mano, sono perfette per un look naturale e sono facili da realizzare.

Mandorla

La mandorla è molto simile all’ovale.

Questa è adatta a chi ha dita un po’ tozze e corte, perchè la punta affusolata e delicata, permetterà di slanciare le dita.

La mandorla può essere realizzata sia di media lunghezza- corta, ma anche piuttosto lunga.

Stiletto

Le unghie a stiletto, assomigliano ad una mandorla molto lunga, e appuntita.

Certamente bisogna essere abituate a portare le unghie lunghe: lo stiletto deve avere minimo 3 centimetri di lunghezza!!

Sono indicate quindi per le amanti delle unghie stravaganti, ma anche chi ha le mani paffute, perchè la loro lunghezza, tenderà a slanciarle.

Quadrata/Marylin/Ballerina

Quest tipi di unghie hanno la caratteristica di avere la punta dritta.

Sono sconsigliate su chi ha già di suo una mano piccola e tozza, perchè la punta dritta, taglierà otticamente la lunghezza del dito.

Dunque andranno bene sulle mani già lunghe e belle affusolate.

Forme estreme

Le forme estreme come la Edge, la Cube, Mandorla russa e Mandorla gotica sono belle, a mio parere solo per esposizione.

Sono molto lunghe, difficili da portare e difficili da realizzare.

Se le si vogliono avere per un giorno, allora ok, però nella vita quotidiana sarebbero un po’ difficili da gestire.

Spero che questo articolo breve ma conciso possa esservi stato d’aiuto.

Se questo articolo vi è piaciuto, non scordatevi di lasciare un like e condividere.

Seguitemi pure su Instagram e su Youtube!

Alla prossima!

SOFIA

Can nail art with bubble be made with regular polish?

Welcome back to my blog!

Today I want to tell you about the foam art with nail, which has been on the web in the last few days.

Let’s start!

Nail art with gel

This is the nail art I’m talking about!

Surely you’ve seen it in many posts around the web and there are already several tutorials explaining how to do it.

In short, to create this effect, after applying a color of your choice and then a top coat without curing it, place the foam on the nail surface.

Once this is done, it polymerizes and you’re done!

If you want to see how it is done, on youtube you will surely find many ideas.

Nail art with nail polish

Then I asked myself:

Can it also be made with regular polish?

You know I like trying to make nail art that is created with gel even with normal nail polishes, as you may recall from the spider gel.

This time, unfortunately, it wasn’t very successful.

Realization

Also in this case, after applying the color, I put a rather abundant layer of top coat, and tried to apply the foam.

Here the problems started already. The foam slipped away, and even if I could make it stay, it melted immediately.

Probably this is given by the chemical composition of the polish which, perhaps reacting with soap, makes it melt.

However, once the foam had disappeared, the effect remained slightly, but not as evident as with a top coat gel.

Also made with gels, this nail art is really fast and beautiful.

It took me about a quarter of an hour to do it with polishes without counting the eternal drying times.

Can it be done?

So it can be realized?

More or less I would answer.

The result is not the best, it takes a long time so I don’t know if it’s worth it.

Obviously if you want to try and you will succeed, let me know!

I leave you here the link of the video where I show the realization of this nail art, which unfortunately, I consider a failure.

If you liked this article, leave a like and share!

Don’t forget to follow me on Instagram and on my Youtube channel!

See you soon!

SOFIA

Si può realizzare la Nail art con la schiuma con lo smalto?

Bentornati sul mio blog!

Oggi voglio parlarvi della nail art con la schiuma, che in questi ultimi giorni sta spopolando sul web.

Iniziamo!

Nail art con gel

Questa è la nail art di cui sto parlando!

Sicuramente la avete vista in parecchi post in giro sul web ed esistono già molti tutorial che spiegano come realizzarla.

In breve, per creare questo effetto, bisogna, dopo aver applicato un colore a scelta e in seguito un top coat senza polimerizzarlo, appoggiare sulla superficie dell’unghia la schiuma.

Una volta fatto ciò si polimerizza e il gioco è fatto!

Se volete vedere come si realizza, su youtube troverete sicuramente molti spunti.

Nail art con smalto

Allora io mi sono domandata:

Si potrà realizzare anche con del semplice smalto?

Sapete che mi piace provare a realizzare le nail art che si creano con il gel anche con gli smalti normali, come ricorderete dallo spider gel.

Questa volta purtroppo, non è stato un gran successo.

Realizzazione

Anche in questo caso, dopo aver applicato il colore, ho steso uno strato piuttosto abbondante di top coat, e ho cercato di appoggiare la schiuma.

Qui iniziavano già i problemi. La schiuma scivolava via, e anche se riuscivo a farla stare, si scioglieva subito.

Probabilmente ciò è dato dalla composizione chimica degli smalti che forse reagendo con il sapone, lo fa sciogliere.

Comunque, una volta che la schiuma era sparita, l’effetto rimaneva leggermente, ma non evidente come con un top coat gel.

Inoltre realizzata con i gel questa nail art è davvero veloce e ad impatto.

Per farla con gli smalti ci ho messo circa un quarto d’ora senza contare i tempi eterni di asciugatura.

Si può fare?

Dunque si può realizzare?

Più o meno risponderei.

Il risultato non è dei migliori, ci vuole parecchio tempo e quindi non so se ne valga effettivamente la pena.

Ovviamente se vorrete provare e ci riuscirete, fatemi sapere!

Vi lascio qui il link del video dove dimostro la realizzazione di questa nail art, che per sfortuna, considero un po’ un fallimento.

Se questo articolo vi è piaciuto, lasciate un like e condividete!

Non scordatevi di seguirmi su Instagram e sul mio canale Youtube!

Alla prossima!

SOFIA